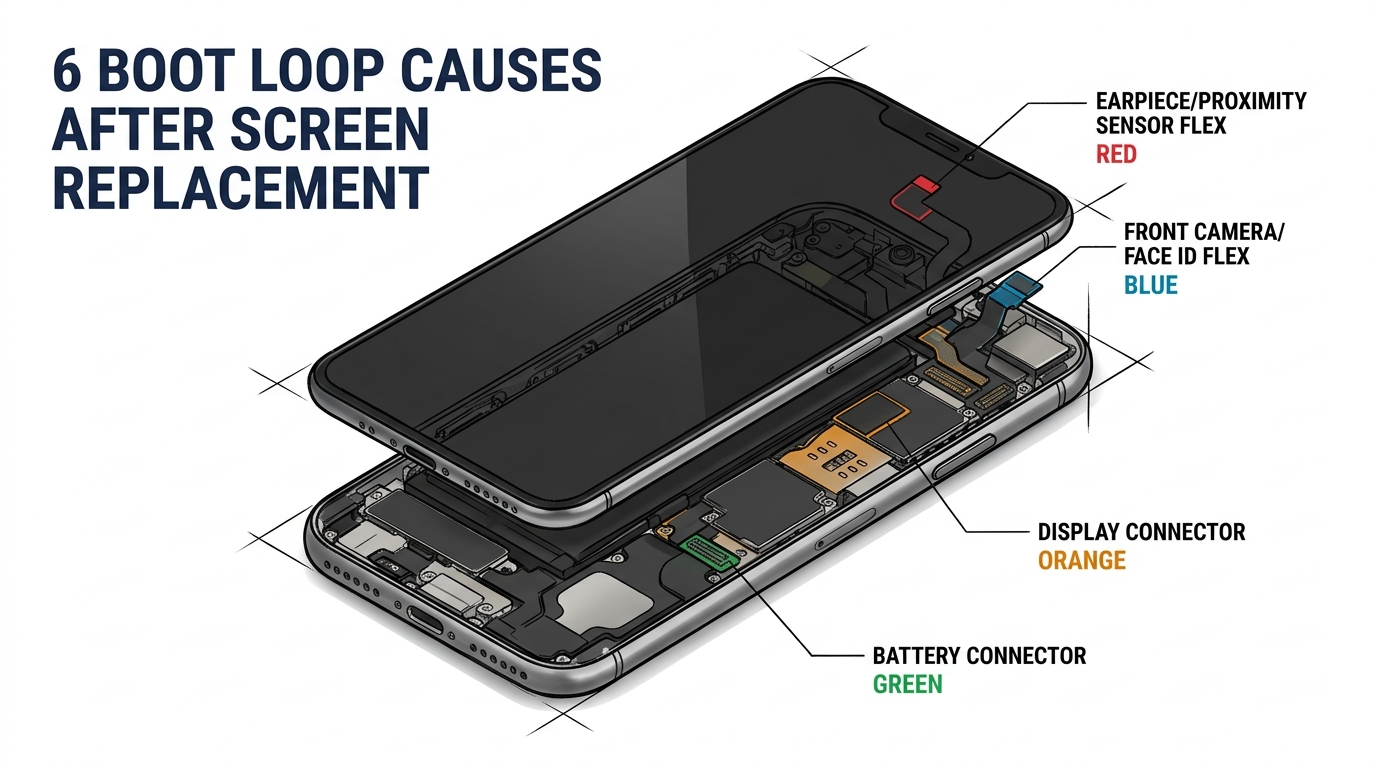
Blurry Camera After Screen Replacement: Is It the Screen, the Bracket, or the Installation?
In a hurry? Jump straight to the 5-step bench diagnostic tree.
A blurry camera after screen replacement is one of the most annoying callback types in a repair shop because the camera still works.
Note for readers: This is a diagnostic, QC, and supplier-dispute guide written for professional repair shops, bench technicians, and wholesale parts buyers. If you are a phone owner and your camera became blurry after a repair, return the device to the shop that did the work — do not open it yourself.
There is no black preview, no obvious dead module, and no easy yes-or-no failure. The customer can open the app, take a photo, and still say the repair is wrong. That turns a simple bench complaint into a blame problem: was it the screen, the bracket, dust, heat, bad handling, or damage that was already there before the job started?
For repair shops, this matters because the cost is rarely just one free reopen. It becomes rework labor, customer distrust, supplier argument, and sometimes a replacement part that should never have been installed in the first place. For wholesale buyers, it is a sourcing and QC problem. A batch with poor camera-area tolerance can quietly destroy margin even if the screens power on normally.
This article is not about dead cameras, black camera preview, or Face ID pairing issues. If that is the fault, start with our camera not working after iPhone screen replacement guide. This guide is about cameras that still function but now produce soft, hazy, foggy, or unstable images after a screen replacement. The goal is to help repair shops separate pre-existing damage, install-side mistakes, and supplier-side tolerance problems before the complaint turns into a losing dispute.
Sourcing Replacement Screens in Bulk?
Incell / Hard OLED / Soft OLED grades — wholesale pricing, grade comparison on request.
Get Wholesale QuoteNot all camera problems are the same
The first mistake is using one word for every post-repair camera complaint.
“Blurry camera after screen replacement” can actually mean several different things:
- the image is uniformly soft across the whole frame
- the image looks milky or foggy
- only one corner or one area looks hazy
- the rear camera keeps hunting for focus
- the selfie camera works but is never truly sharp at normal distance
- the camera is clear before sealing and soft after final closure
Those are not the same fault.
In practical repair terms:
- soft / blurry usually means the image lacks clean edge sharpness
- hazy / foggy usually means contrast is reduced, as if a thin veil is over the image
- local haze often points to contamination or a localized optical obstruction
- focus hunting usually points to a rear camera autofocus or pressure problem, not a front-camera problem
That distinction matters commercially. If the fault is described badly, the repair shop starts checking the wrong parts, files the wrong supplier claim, and wastes time on reopen work that never had a chance to fix the real cause.
Front camera vs rear camera: the diagnostic logic is different
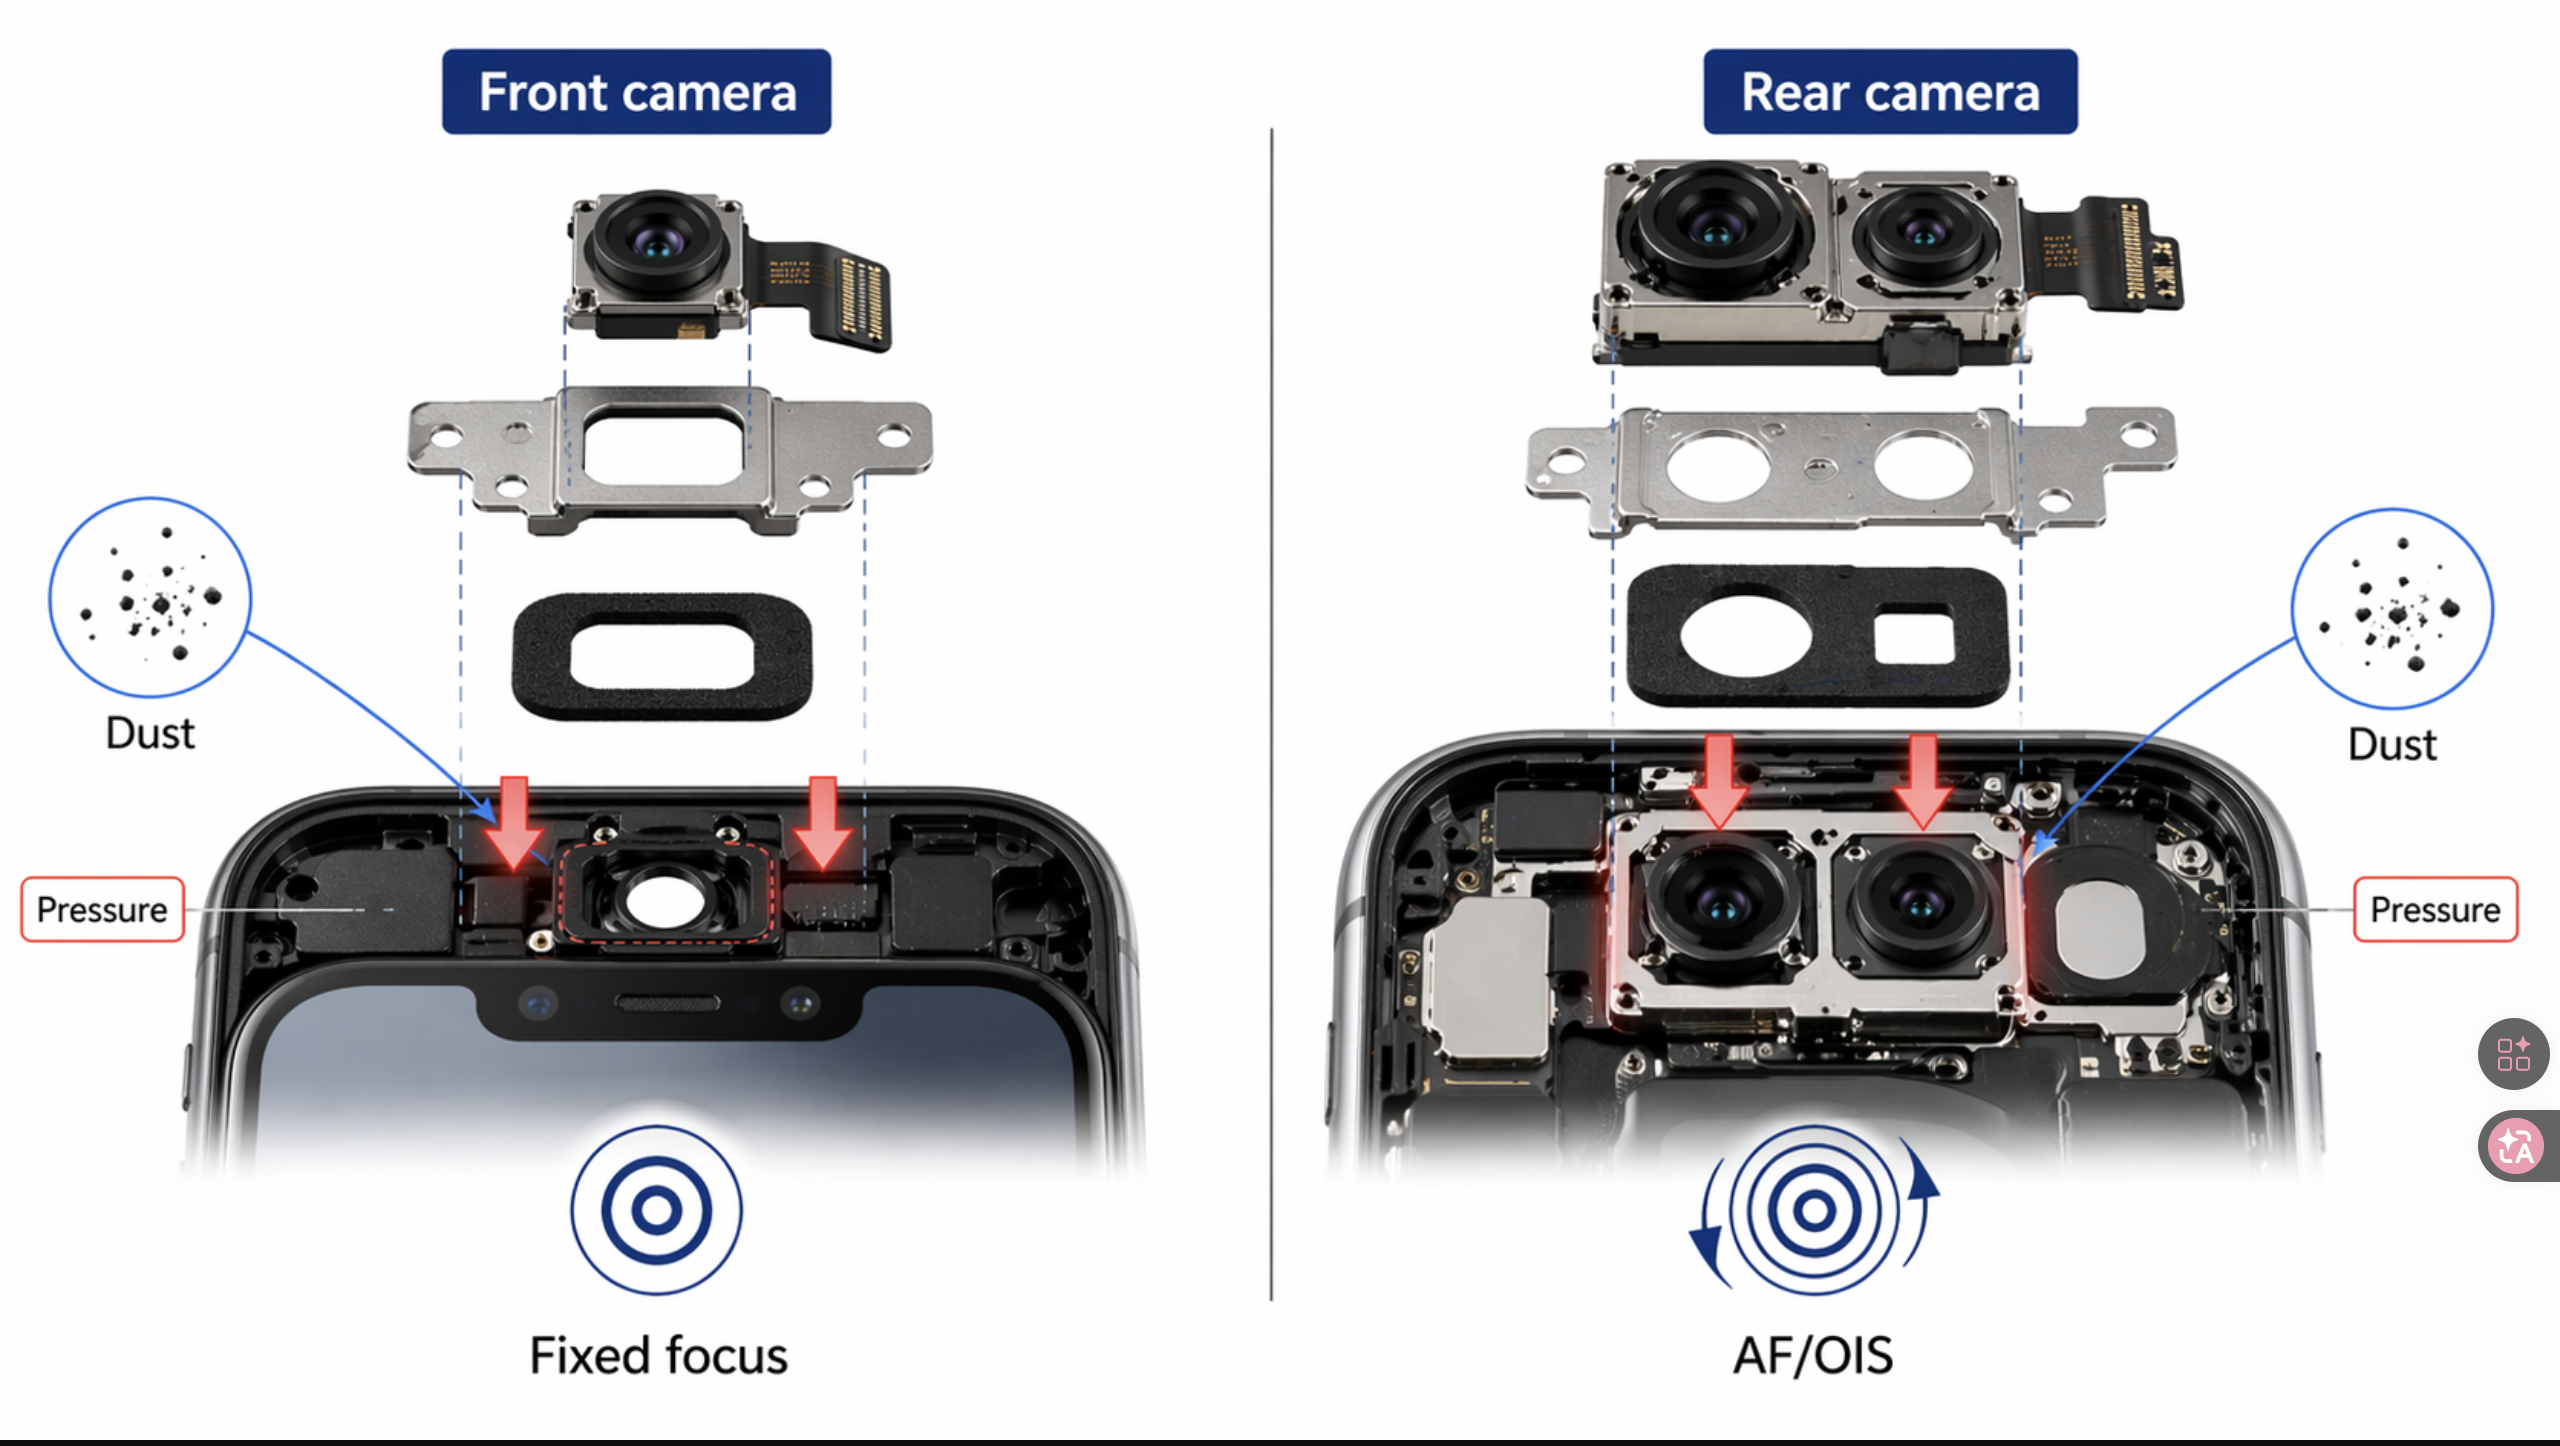
A shop should never diagnose front-camera blur and rear-camera blur the same way.
Front camera blur after screen replacement
On many models, the front camera is fixed-focus. That means the camera does not have a motor constantly searching for focus the way many rear cameras do. If the selfie image becomes soft after the repair, the most likely causes are physical:
- something is blocking or diffusing the lens path
- the module is not seated correctly
- the bracket, foam, or aperture area is misaligned
- the distance between the camera and the opening has changed
- the module or its optics were damaged by heat, IPA, or contamination
This is why front camera blur after screen replacement often points back to the screen assembly, the transferred bracket parts, or the install process.
Rear camera blur after screen replacement
Rear camera blur is different. The screen swap usually does not directly replace the rear module, so when the rear camera becomes blurry after repair, you should think about indirect causes first:
- pre-existing drop damage to OIS or autofocus parts
- heat exposure during back-glass or nearby rework
- IPA or residue entering the camera area
- bracket pressure or reassembly distortion
- dust or contamination introduced while the phone was open
That distinction is important because a repair shop that treats every post-repair blur complaint as “screen quality” will misclassify a lot of rear-camera faults.
The three-bucket model repair shops should use first
The best way to diagnose a blurry camera after screen replacement is to split the problem into three buckets.
1. Pre-existing damage
This bucket includes faults that were already present before the repair but were not tested, not documented, or not obvious to the customer.
Typical examples:
- prior drop damage to the camera module
- cracked or scratched outer camera glass
- weakened OIS or autofocus actuator
- hidden lens or coating damage
- existing dust or contamination
This is one of the biggest dispute patterns in repair work. A phone arrives with a broken screen after a drop. The customer only notices the camera quality issue after the screen looks new again. Without pre-repair testing, the shop has no proof that the fault was already there.
2. Install-side error
This bucket includes problems created during the repair itself.
Typical examples:
- dust or fingerprints introduced into the camera area
- IPA residue or liquid run-off
- excessive hot air near the camera optics
- front camera module not seated properly
- bracket, foam, or gasket transferred incorrectly
- protective film left over the inner camera aperture
- too much pressure during closure or clamping
These are the faults most likely to be fixable by reopening the phone, correcting the assembly, and retesting before sealing again.
3. Supplier-side tolerance or assembly fault
This bucket includes problems where the screen assembly itself is the reason the camera no longer produces a clean image.
Typical examples:
- camera opening slightly off-center
- frame or bracket geometry out of tolerance
- foam height or gasket stack changing standoff distance
- inner window quality causing haze or diffusion
- overall screen thickness changing front camera alignment
- pre-installed parts not matching OEM layout closely enough
This is the category many shops underestimate because the screen can look fine in every other way. Touch works. Brightness works. The panel fits. But the camera path is no longer optically right.
Dust, fingerprints, and hidden contamination
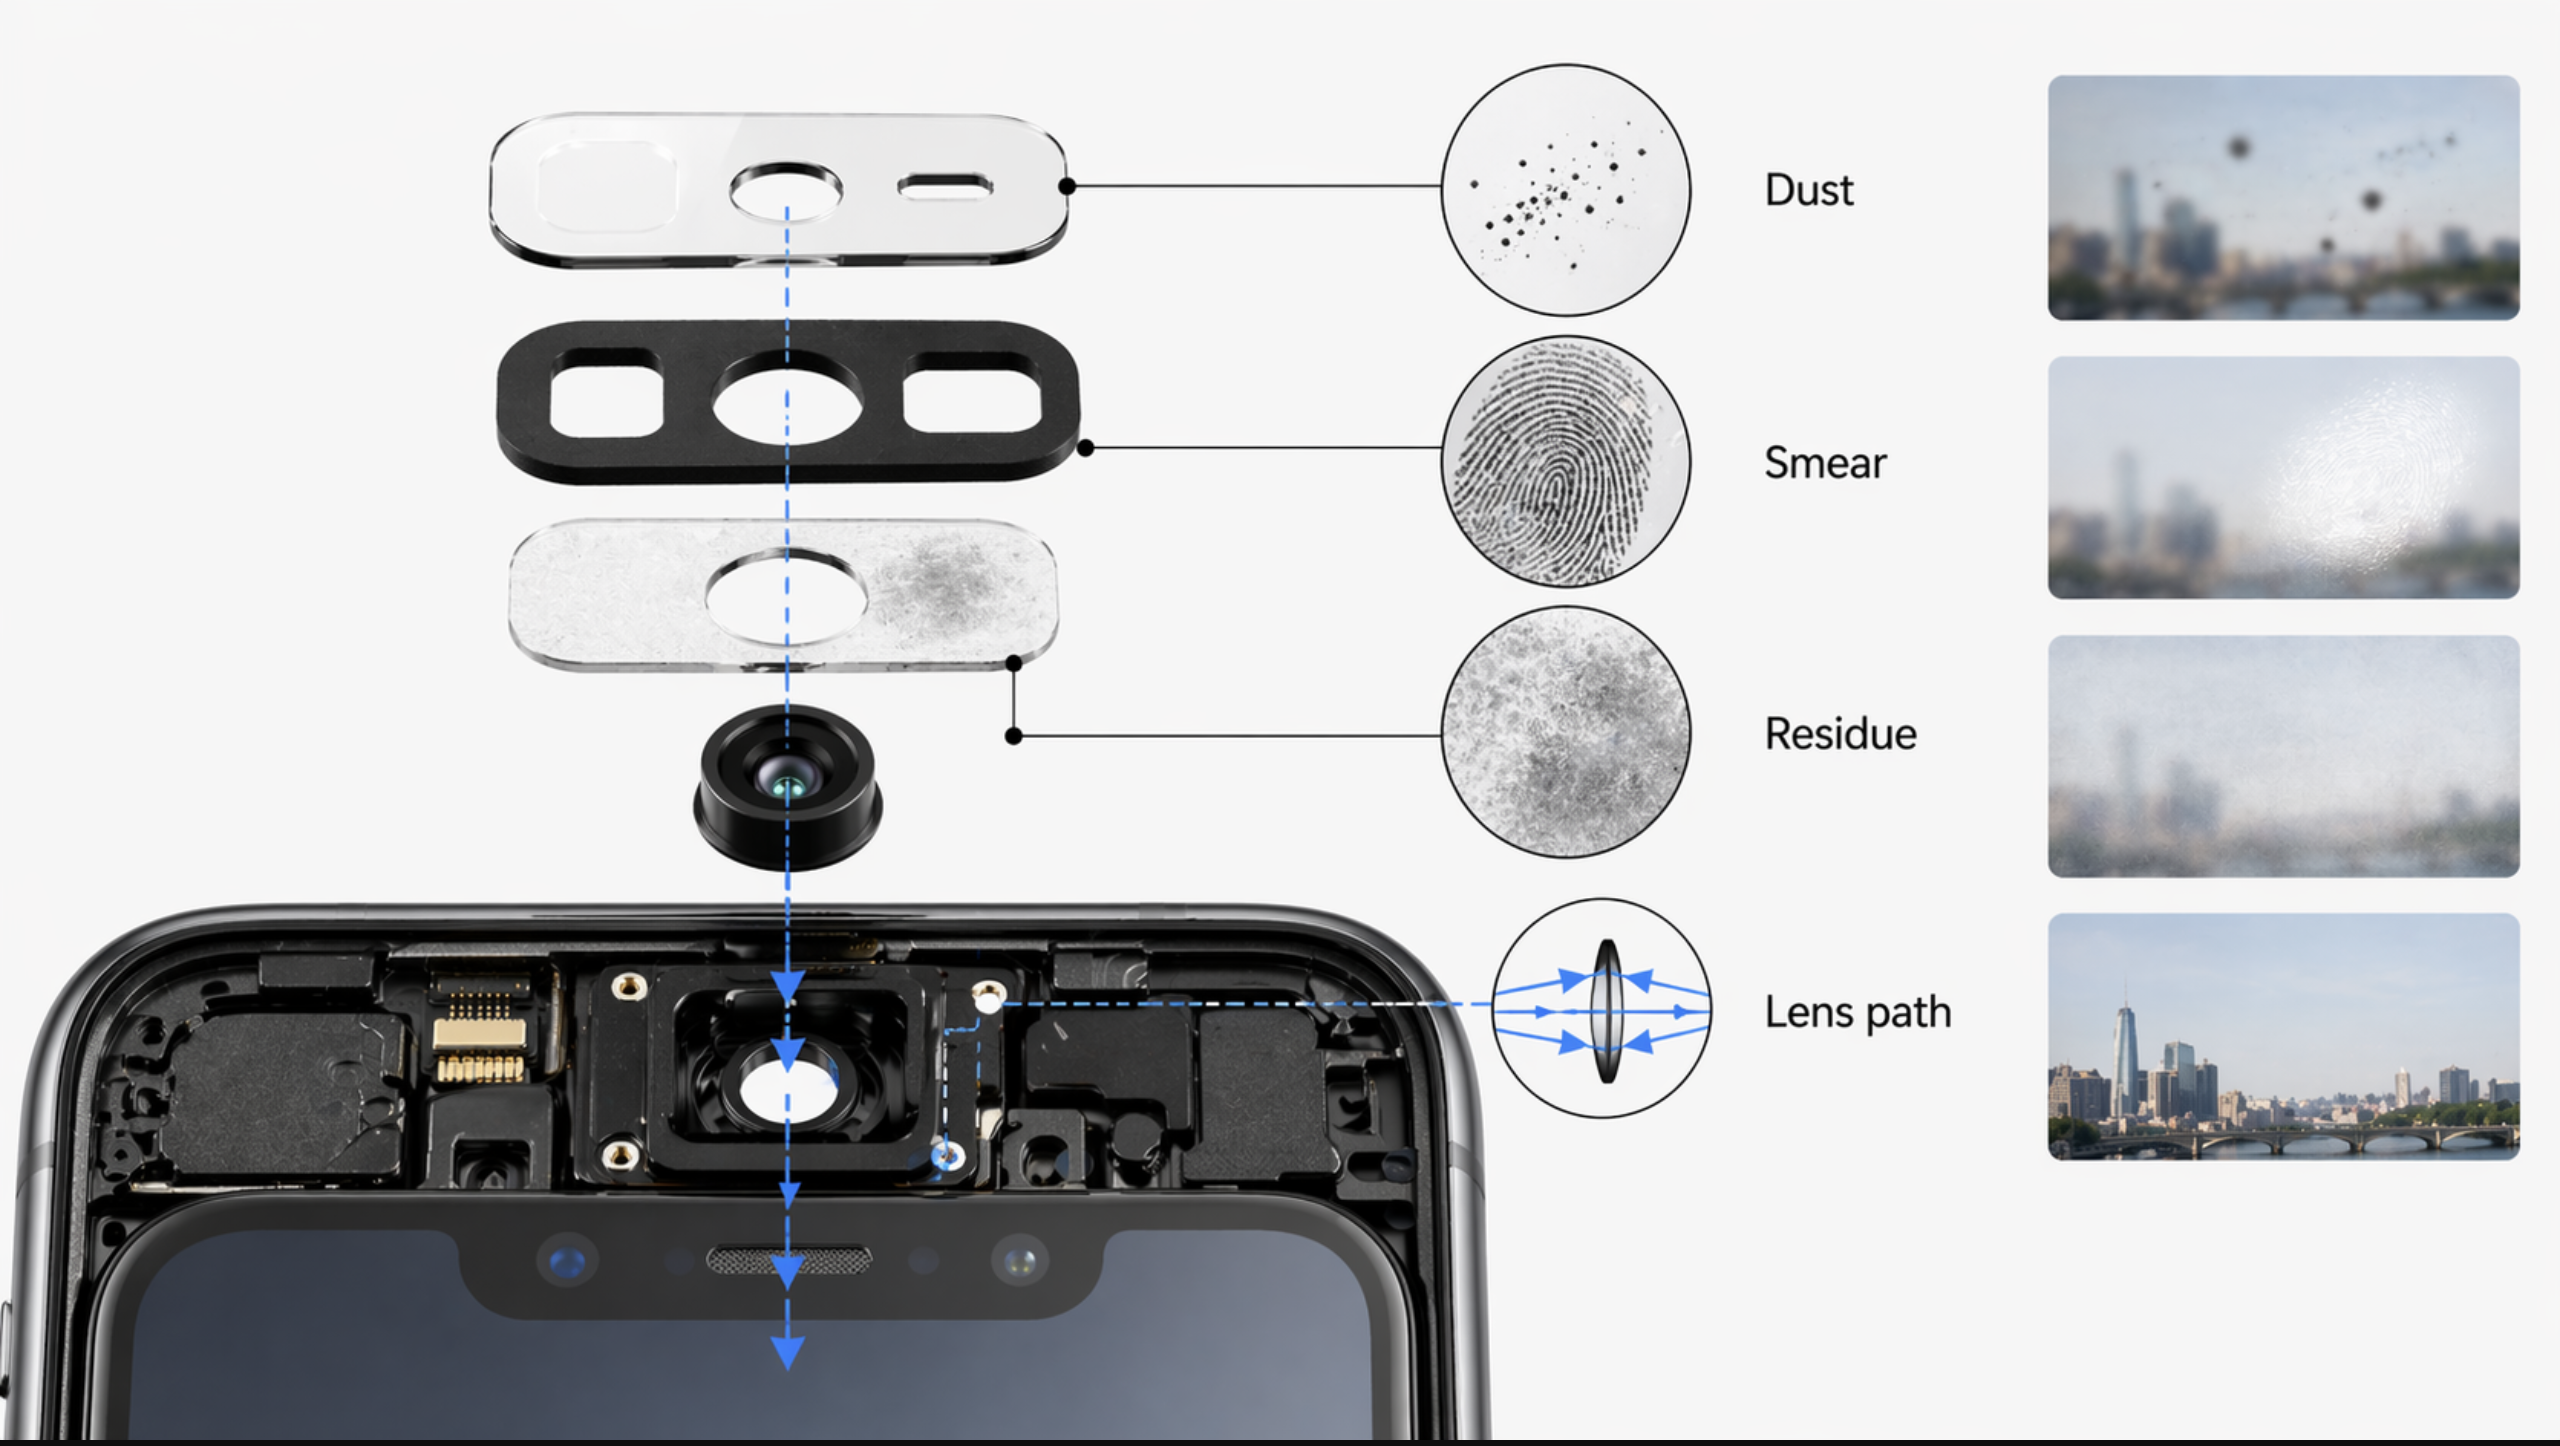
Dust is one of the most common reasons a camera becomes blurry after repair, especially if the phone was open for longer than expected or if the work area was not well controlled.
What makes dust difficult is that it does not always look dramatic from the outside. A small particle, lint fiber, or smear in the optical path can create:
- general softness
- localized haze
- reduced contrast
- small dark or gray spots
Technician forums repeatedly point to the same lesson: once contamination gets into the module area, aggressive cleaning often makes the problem worse, not better. That is why shops should treat contamination control as a prevention issue, not as something that can always be corrected later.
The same applies to fingerprints. A clean-looking camera window can still have an oil film from handling. That can create the exact kind of milky softness customers describe as “foggy.”
This is one reason our wholesale iPhone screens buyer checklist should never be limited to panel grade and price. Assembly cleanliness around the camera area is part of the real delivered quality.
Heat damage is more common than many shops admit
In repair-forum cases and shop RMA handling, this pattern repeats often: many technicians still underestimate how easy it is to damage smartphone camera optics with heat.
The reason is simple: many people still assume the camera lens is glass. In reality, the outer cover may be glass, but the internal optics are often plastic. That means hot air used near the camera area can deform the optical path enough to create permanent softness or haze.
This usually shows up as:
- foggy or milky images that do not improve after cleaning
- lower contrast across the whole frame
- a rear camera that still opens but never looks crisp again
This matters for repair-shop process because the symptom may appear after a completely separate task. A technician may be removing adhesive, softening a nearby section, drying IPA, or working around back-glass repair. The camera was never “replaced,” but it was still damaged.
A blunt but useful rule:
If hot air was used near the camera area and the image turned milky afterward, do not start by blaming the screen.
IPA, residue, and coating damage
IPA is useful, but it is not harmless in every context.
High-purity IPA does not damage glass directly, but it can still create trouble when it:
- carries residue into the optics area
- leaves contamination from wipes or cloth
- affects coatings over time
- runs into the camera area during adhesive softening or cleanup
If a shop floods the adhesive channel with IPA and does not control where it goes, some of that risk lands directly on the camera zone.
This kind of fault is especially dangerous because it creates weak disputes. The customer sees blur. The supplier says the part is fine. The technician says the lens was cleaned. Without process documentation, nobody can prove what actually happened.
That is why this article should connect directly to our repair shop customer dispute script. Camera blur complaints are not only technical. They are evidence problems.
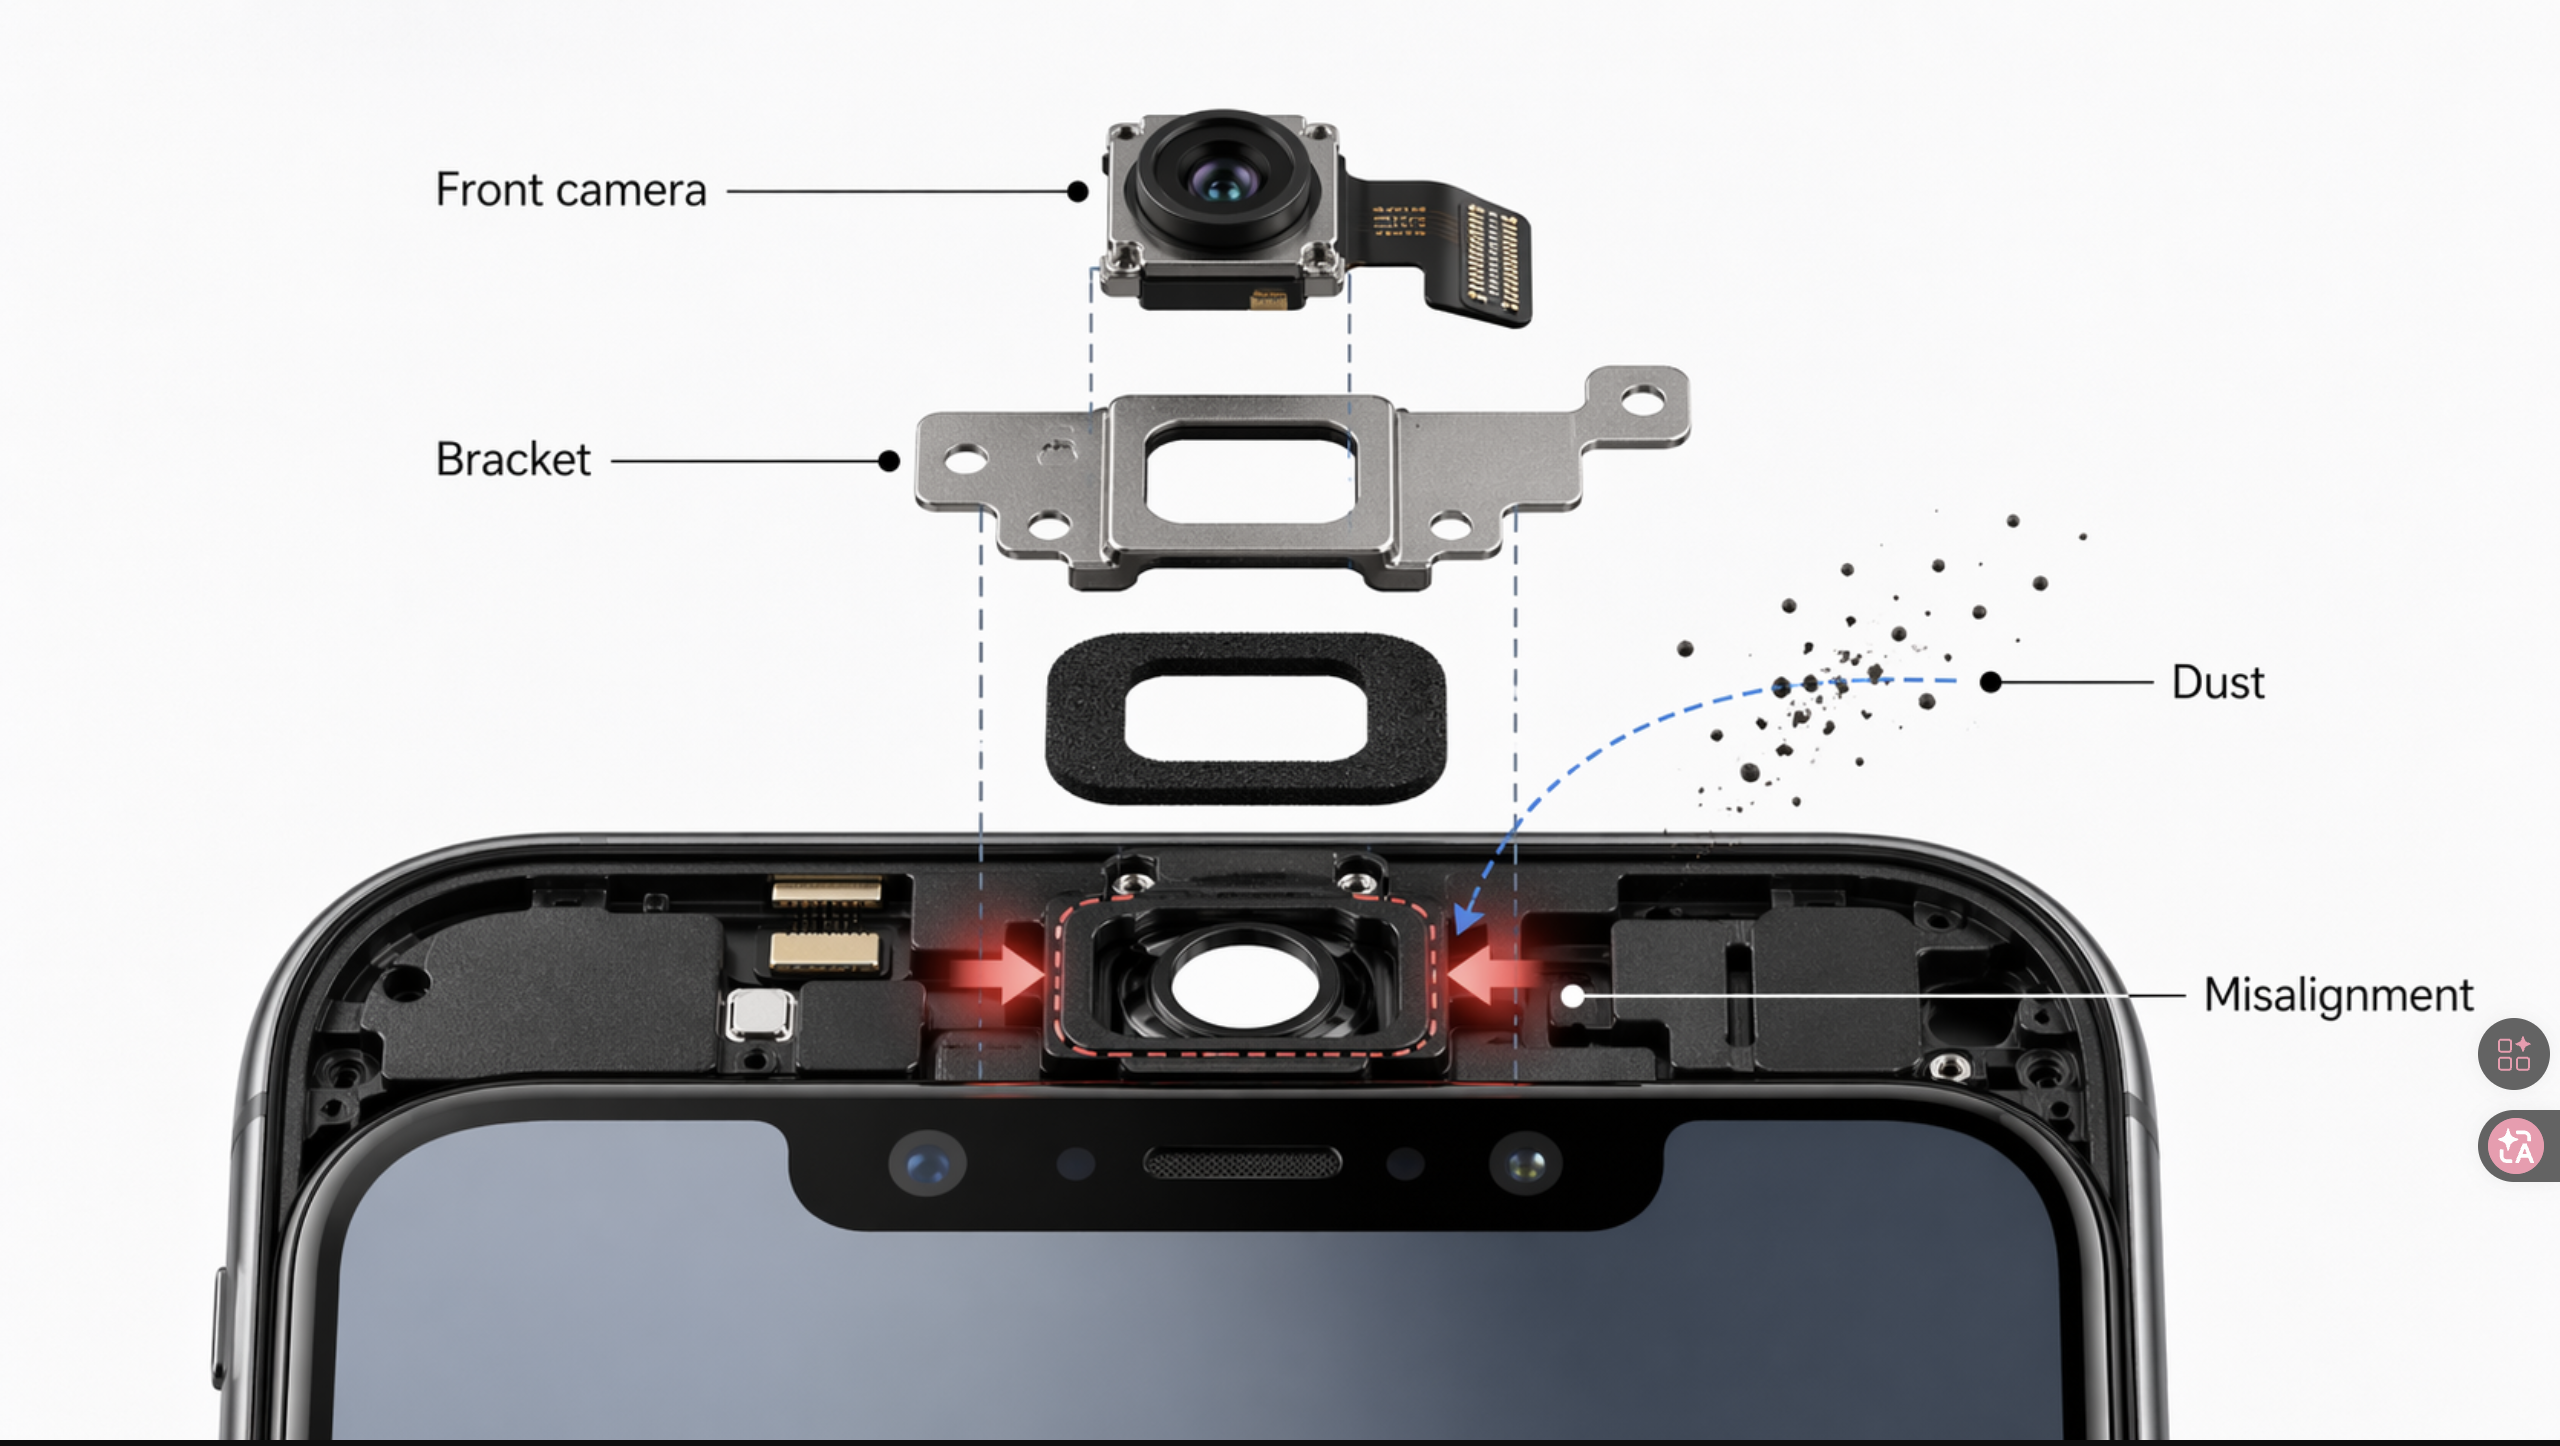
Module seating, bracket pressure, and aperture alignment
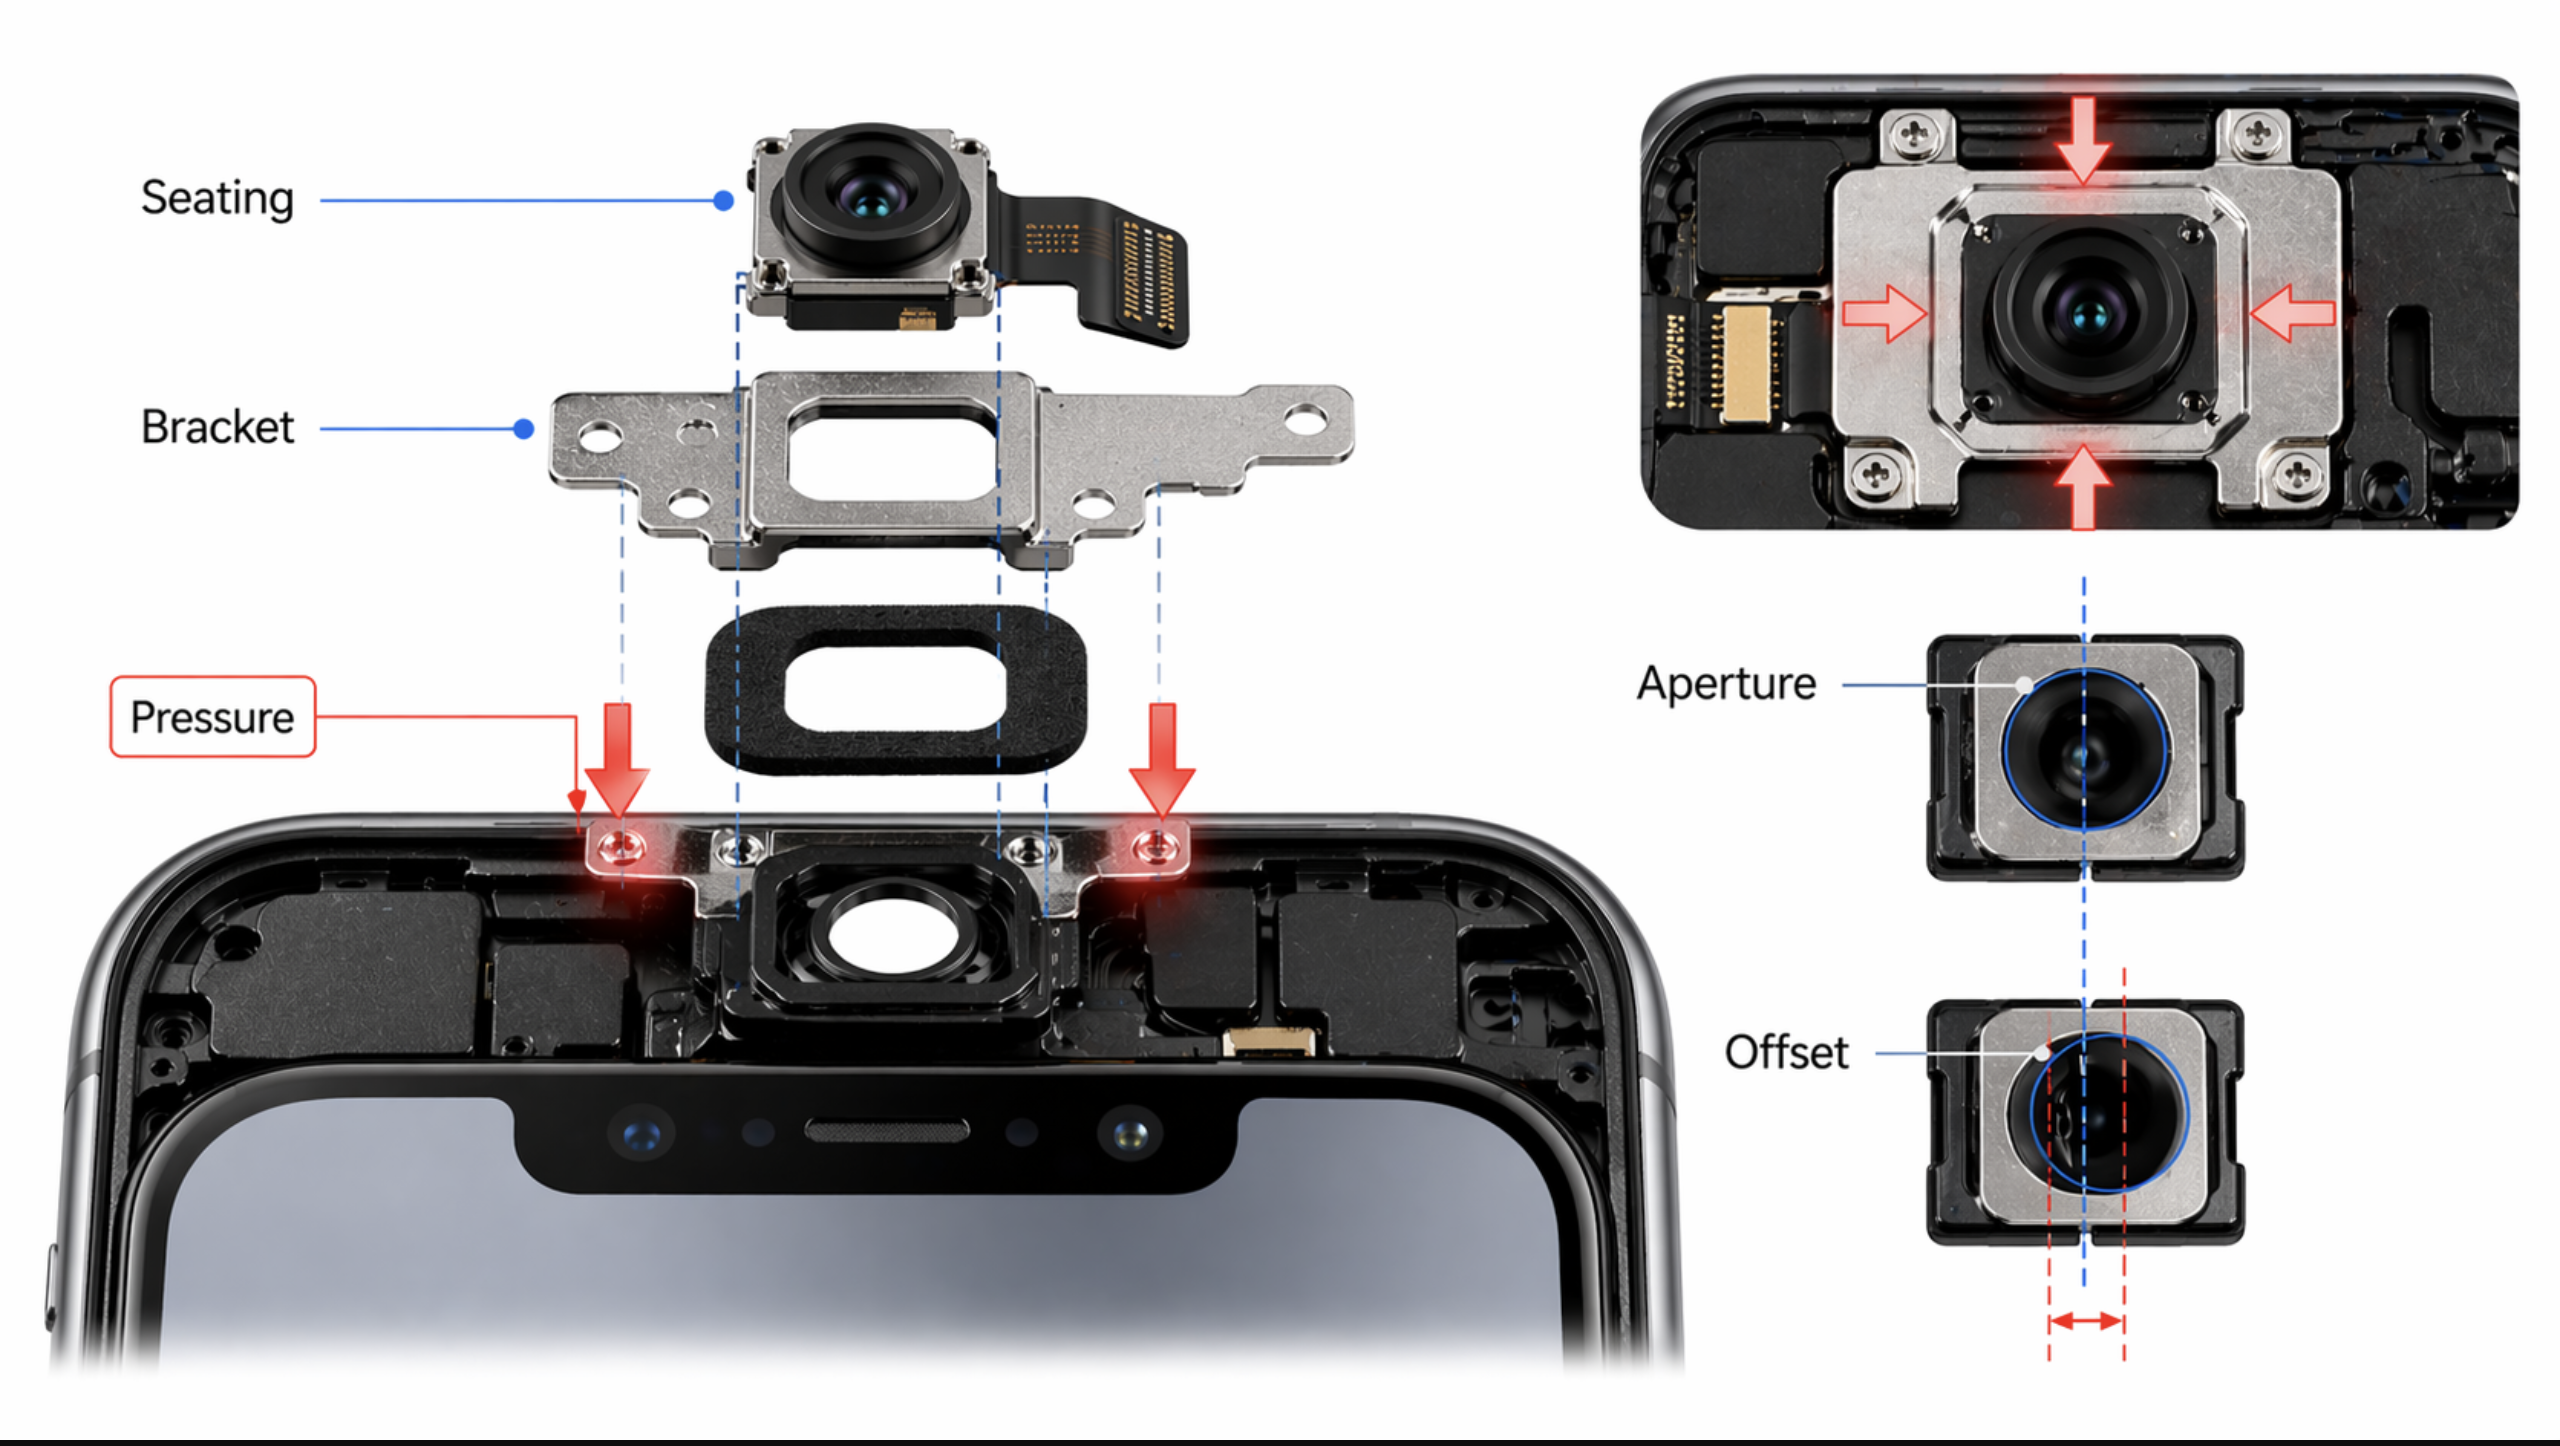
This is where the screen assembly becomes much more relevant.
After a screen replacement, the front camera area is not just a hole in the panel. It is a stack of relationships:
- module position
- bracket geometry
- foam or gasket thickness
- aperture opening alignment
- cable routing
- closure pressure
If any of those relationships change, the camera can still work but produce worse image quality.
This is especially important for front cameras because many are fixed-focus. They depend on the module sitting at the designed distance from the opening. If the new screen assembly changes that distance slightly, the image can become permanently soft even when there is no visible dust and no obvious install mistake.
That is why supplier-side tolerance matters more than many buyers think. A shop can do clean work and still get a blurry selfie camera if the replacement screen changes the physical spacing around the camera area.
Screen assembly thickness and supplier-side geometry fault
Geometry tolerance is a hidden margin killer. A screen that passes touch, brightness, and panel-fit checks can still ship with a camera-area dimension that is slightly off OEM — and create the same blur complaint across an entire batch.
This is the most commercially interesting cause because it explains why some camera blur complaints repeat by batch instead of by technician.
In repair-forum reports and shop RMA records, technicians have documented cases where aftermarket screens changed front-camera standoff enough to cause systematic soft focus. That means the problem was not random dust, not one bad bracket transfer, and not customer imagination. It was a geometry problem built into the part.
In B2B terms, that means a supplier can ship a batch of screens that all pass basic function tests but still create the same complaint pattern:
- same model
- same supplier SKU
- same type of front camera softness
- multiple technicians reporting similar symptoms
That is a supplier-risk pattern.
When to escalate to "supplier-side" — proof standard
Do not jump to "the screen is at fault" too early. Supplier-side becomes the leading explanation only after you have ruled out the cheaper causes:
- inner camera aperture is clean (no film, tape, dust, fingerprints)
- module is correctly seated and bracket / foam / gasket are placed per OEM layout
- no aggressive hot air or IPA was used near the camera area on this job
- the camera was sharp on a pre-seal test
- the same softness pattern repeats across multiple units from the same SKU/batch, or against a known-good comparison screen
Once those conditions are met, batch-level geometry/tolerance becomes the most likely cause — and complaint volume should trigger a batch hold, not just a one-unit retest.
A useful buyer rule:
If multiple units from one batch produce the same camera-clarity complaint, stop treating it as technician inconsistency and start treating it as a dimensional or assembly-tolerance issue.
Before you blame the screen: the fastest repair-shop decision tree
Use this order of checks first.
Step 1. Is it front camera or rear camera?
If it is front camera only, screen-area seating, bracket, aperture, film, or tolerance problems move much higher on the list.
If it is rear camera only, heat, IPA, pressure, contamination, or pre-existing drop damage become more likely.
Step 2. Was there visible drop or impact damage before repair?
If yes, pre-existing damage must stay high on the list. Do not let the fresh screen create a false assumption that every later complaint is the shop’s fault.
Step 3. Was hot air or aggressive chemical cleaning used near the camera area?
If yes, install-side optical damage becomes a serious candidate.
Step 4. Did the camera pass before sealing?
If the image was sharp pre-seal and soft after final closure, think about:
- bracket pressure
- frame distortion
- clamp force
- seating shift during sealing
- adhesive stack or compression
Step 5. Is the complaint repeating on the same model and supplier batch?
If yes, part-side geometry or tolerance becomes much more likely.
A shop that follows this decision tree will isolate responsibility much faster than a shop that starts with guesswork.
What buyers should ask suppliers before ordering
If your shop wants fewer blurry camera after screen replacement complaints, the supplier conversation must get more specific.
Do not ask only:
- is this OLED?
- is this premium?
- what is the price?
Ask these instead:
1. Is the screen assembly dimensionally matched to OEM around the camera area?
You want more than a grade label. Ask about camera opening geometry, front-camera area dimensions, and whether the supplier checks this zone against OEM reference.
2. Is it with frame or without frame?
If it is with frame, ask:
- whose frame is used
- whose bracket set is used
- what foam or gasket layout is included
With-frame assemblies can reduce transplant risk, but they can also introduce hidden tolerance risk.
3. Are all inner protective films removed, including anything over the camera aperture?
This sounds basic, but it is one of the easiest avoidable blur causes.
4. What QC is done around camera-window alignment and front-camera clarity?
Ask whether the supplier does:
- real-device test installs
- camera-area visual QC only
- batch-level complaint tracking
5. Has this batch had any camera softness, haze, or focus complaints?
A serious supplier should be able to answer this in a useful way.
6. What is the RMA policy if a documented camera-clarity issue is traced to screen tolerance?
This is where many buyer disputes are won or lost. Ask before ordering, not after the complaint starts.
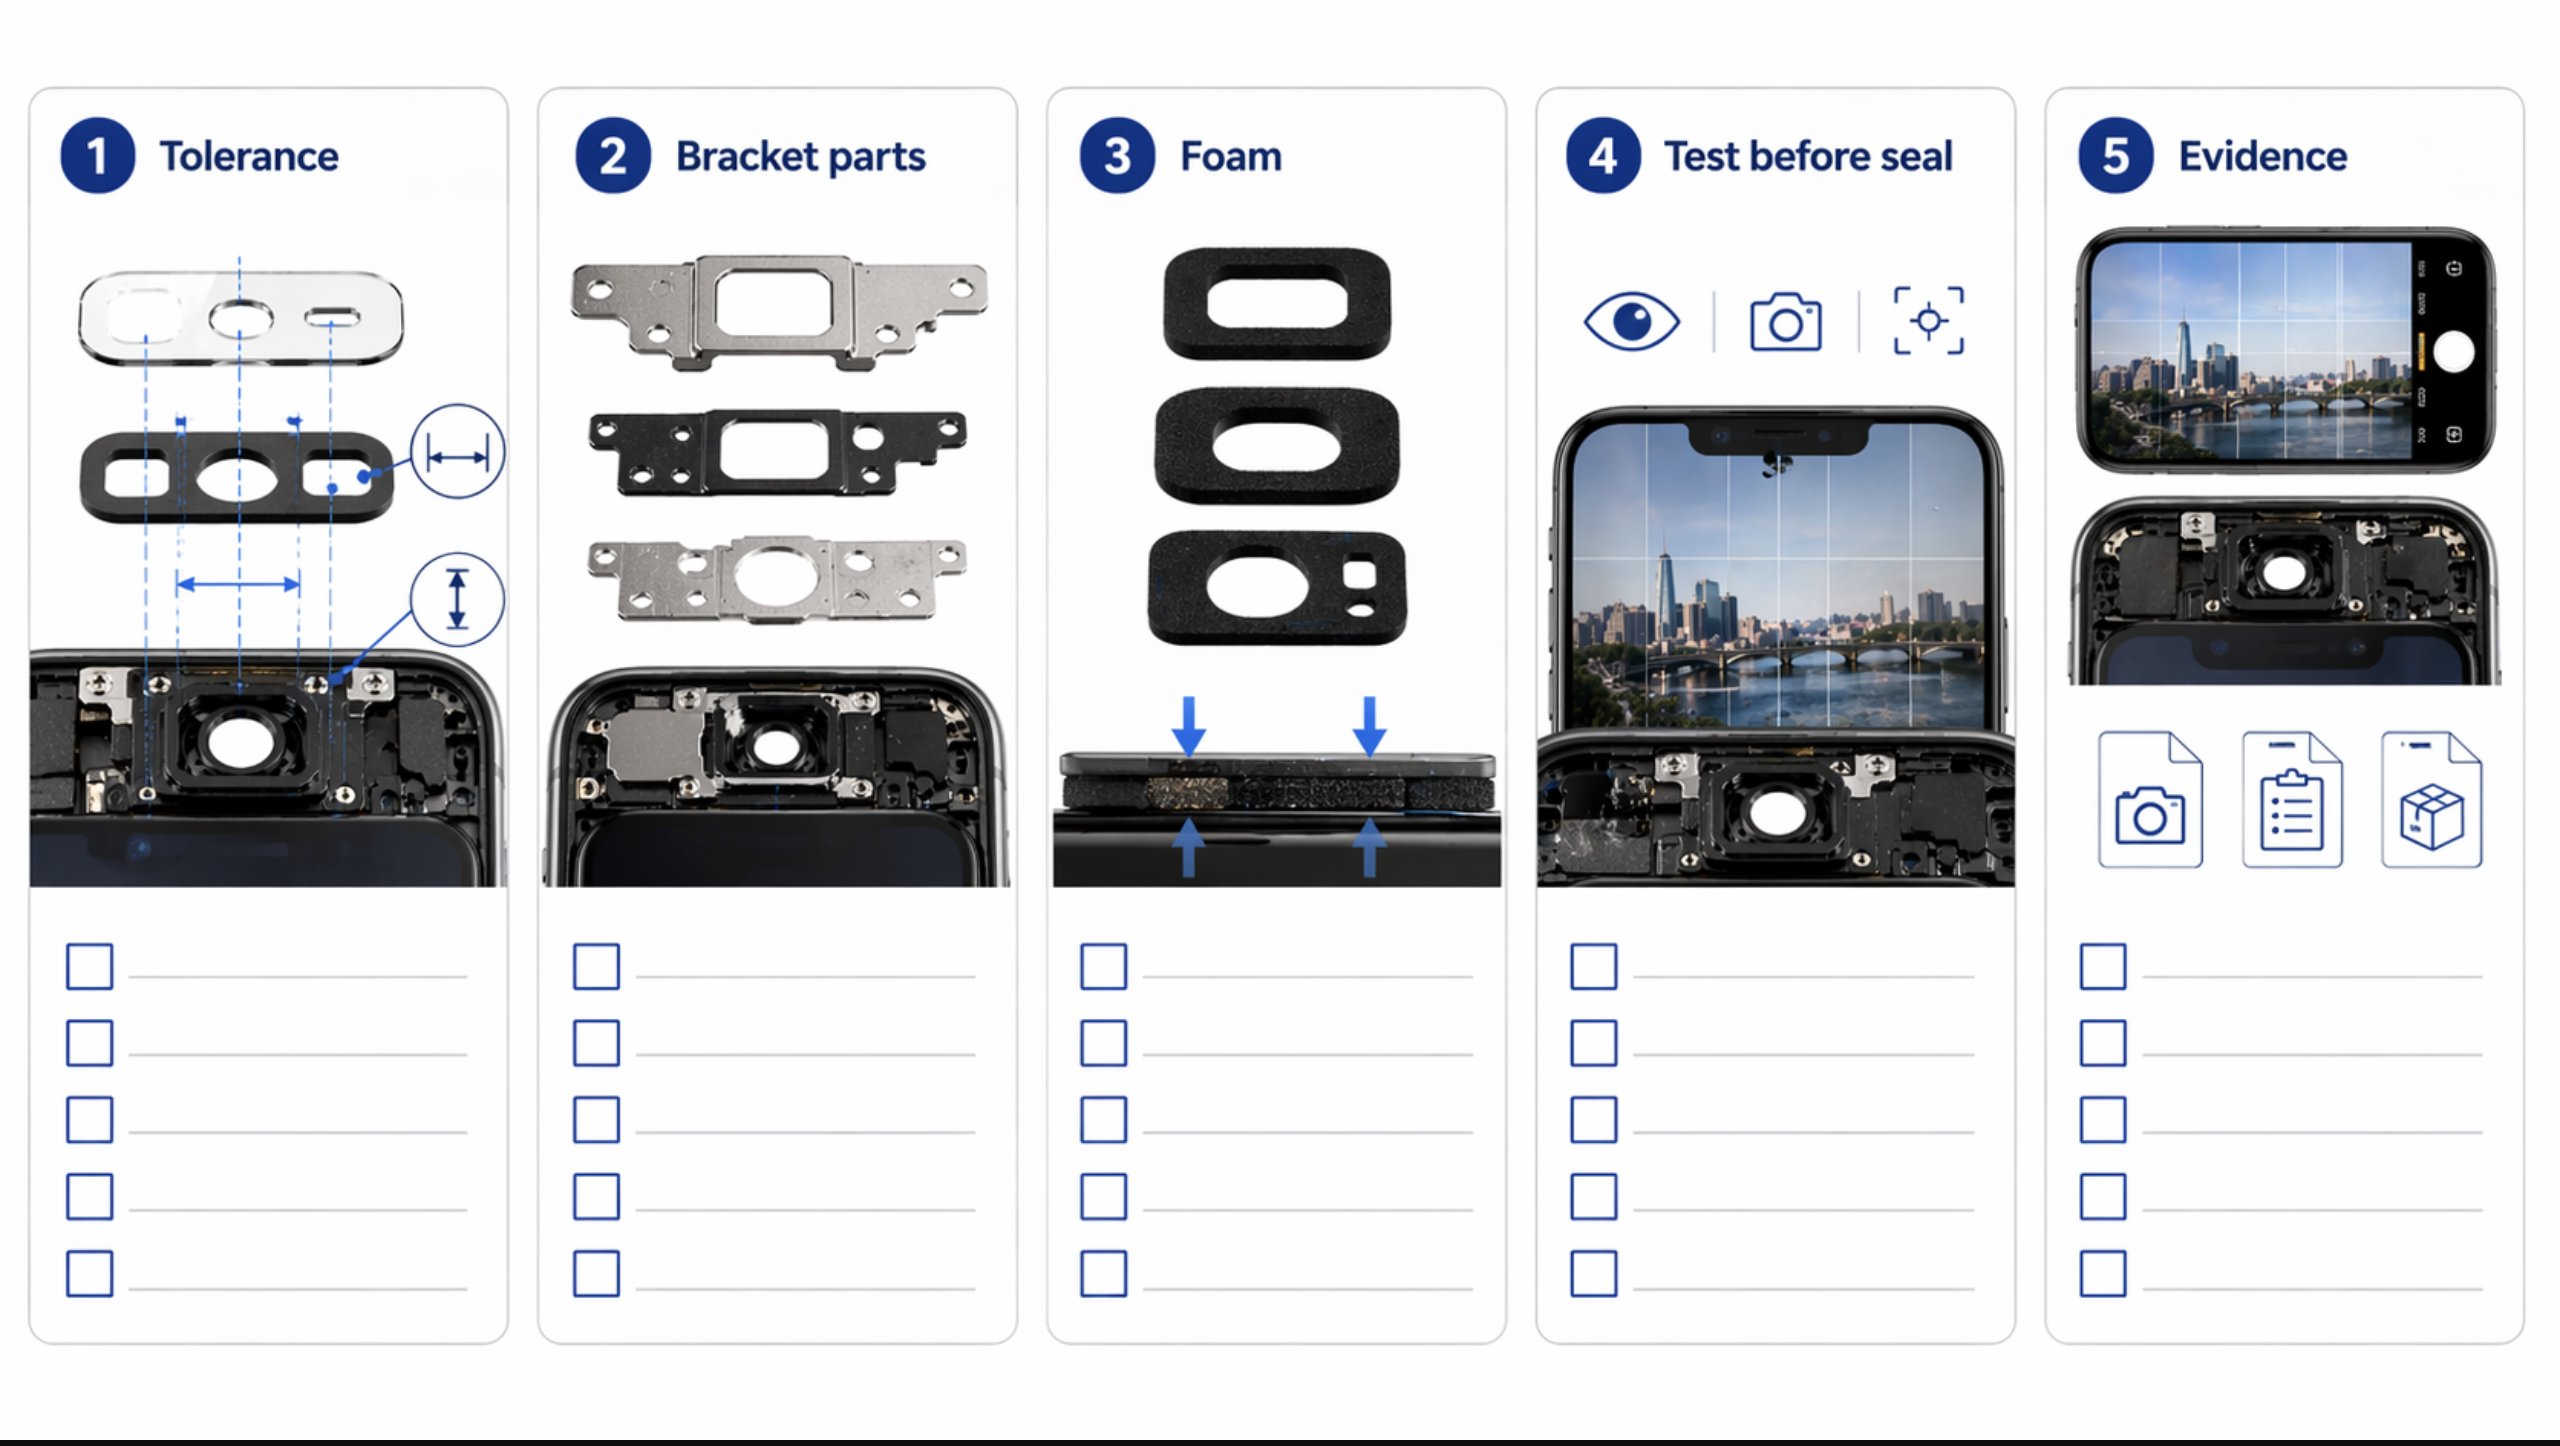
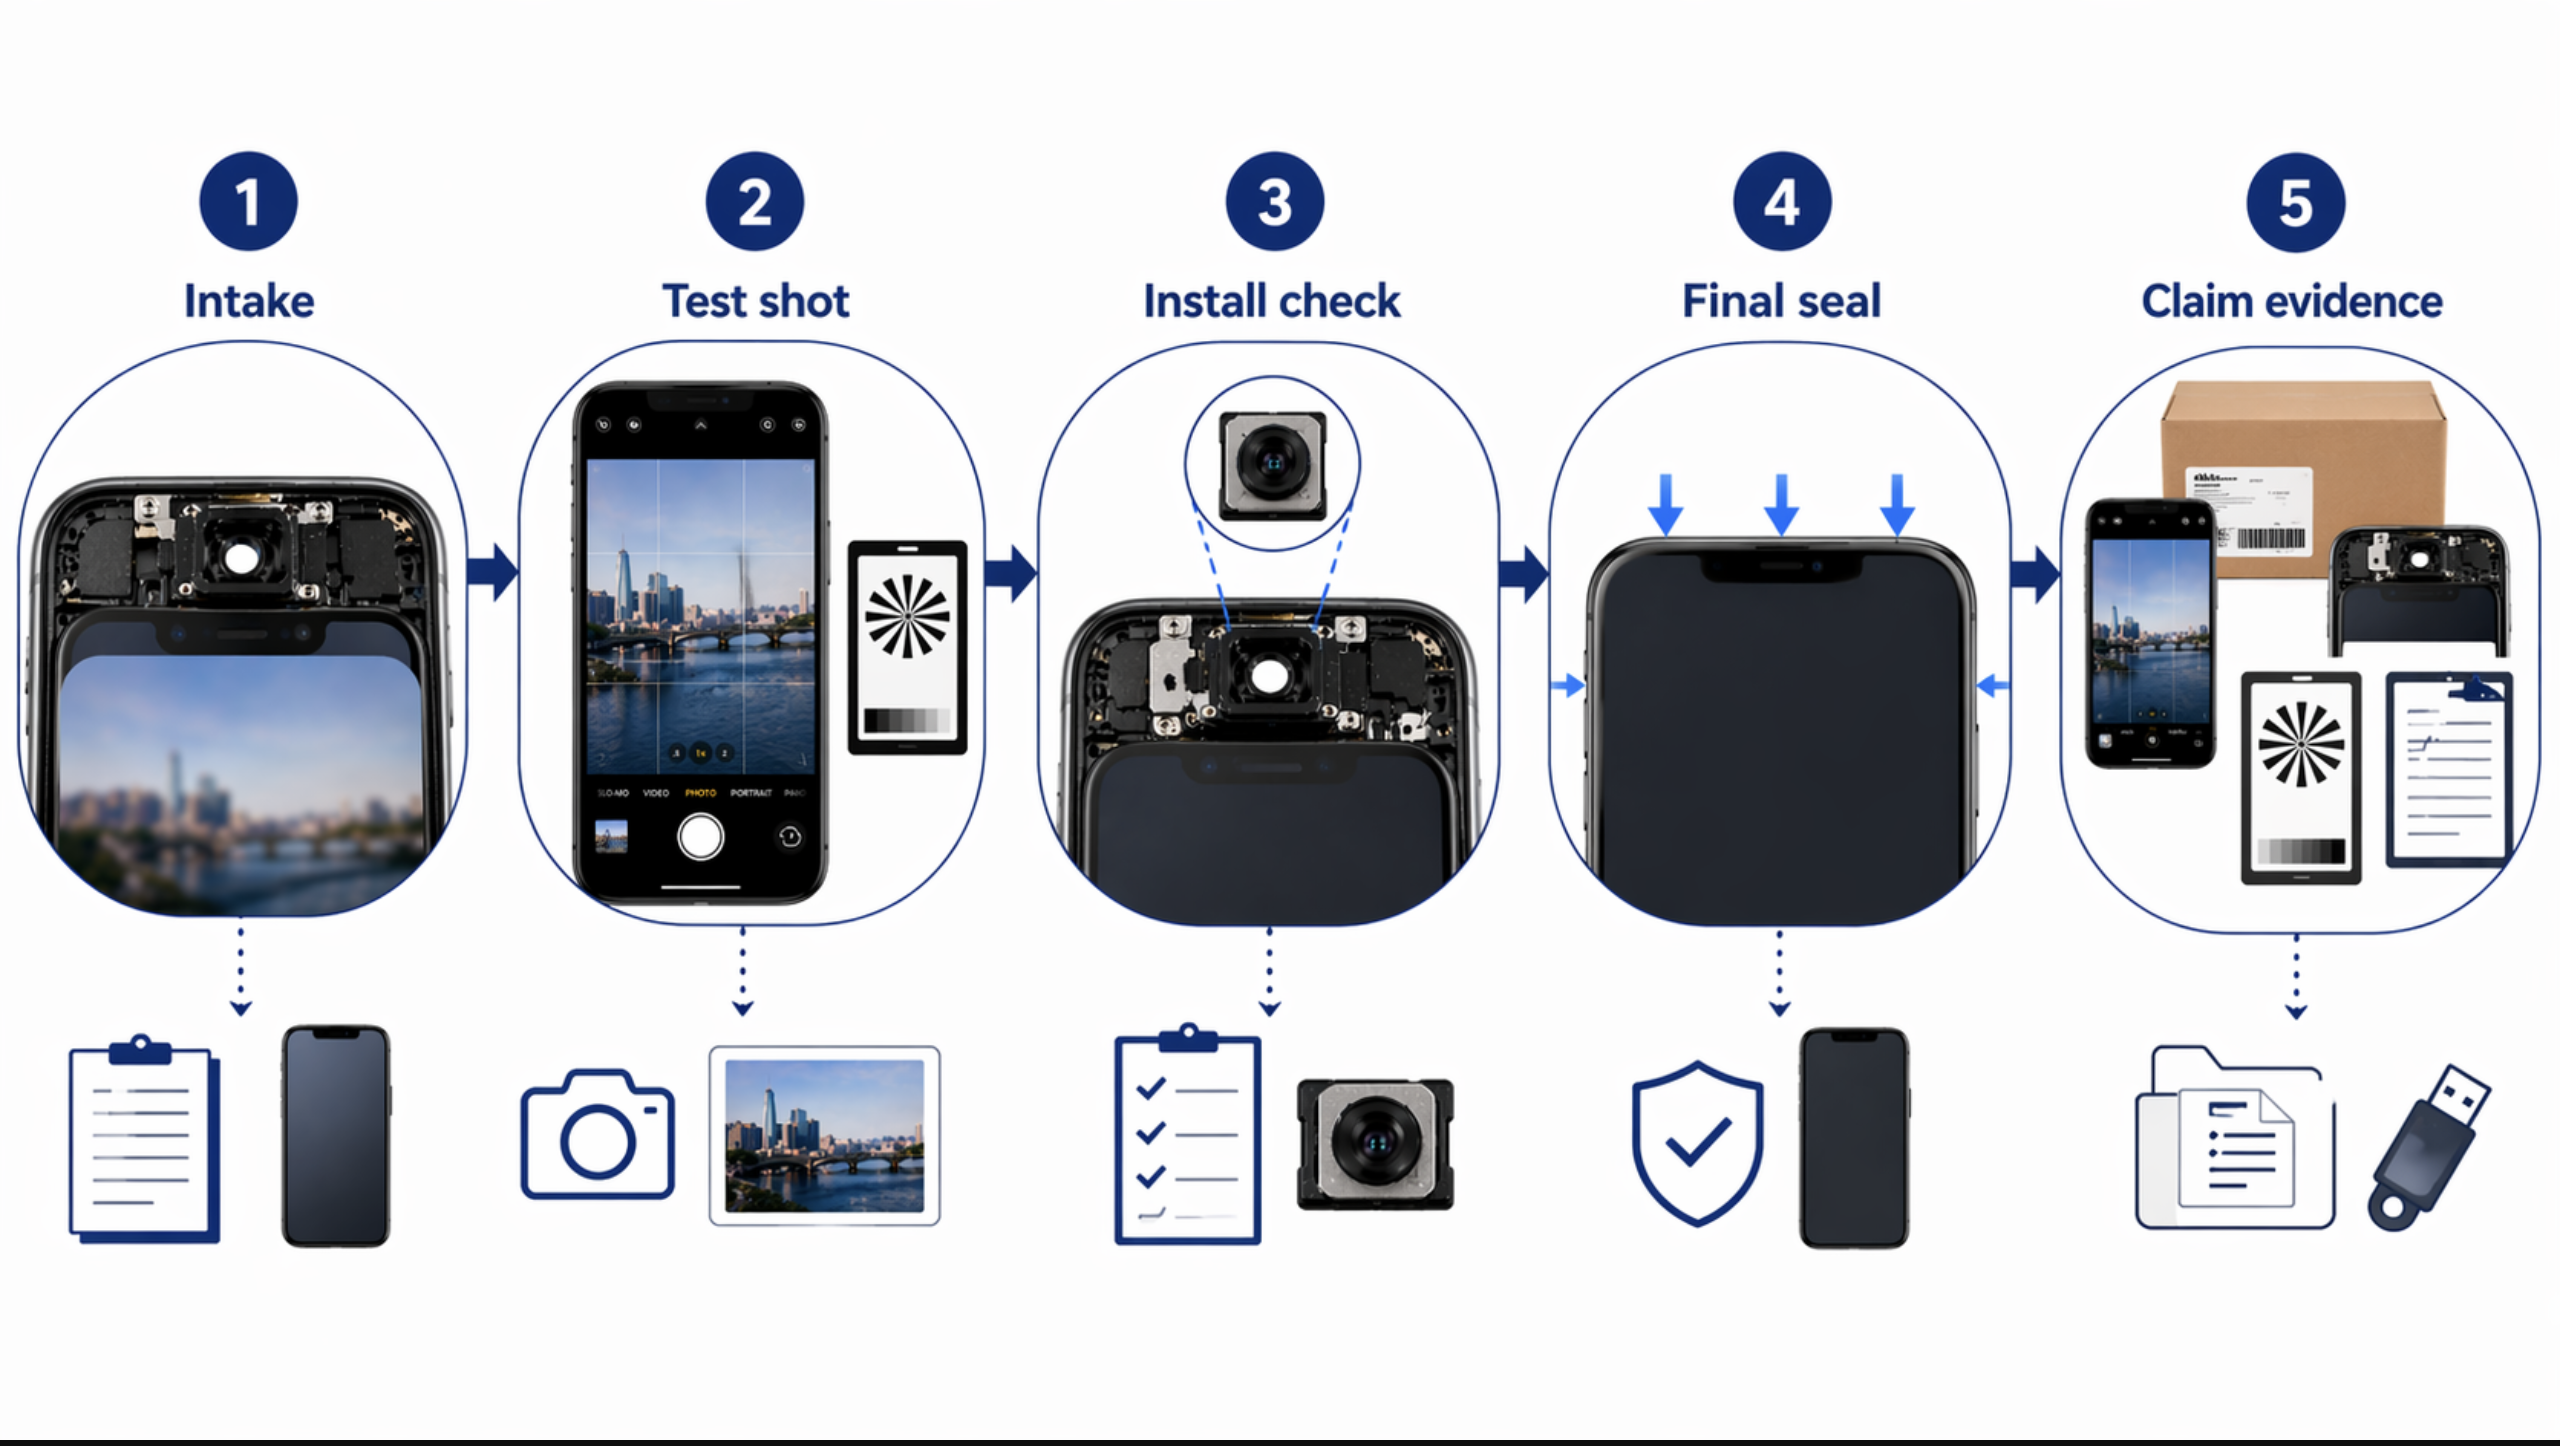
Receiving QC and pre-seal testing that shops should standardize
Most blurry camera after screen replacement complaints become expensive because the shop discovers them too late.
The correct place to catch many of them is before final sealing.
Receiving QC
When a new batch arrives, check:
- inner camera aperture for film, tape, dust, or haze
- camera-window opening for centering and clean edges
- frame, foam, and gasket consistency on with-frame assemblies
- visible scratches or optical distortion near the camera window
- batch consistency across units, not just one sample
If the SKU is new or the supplier is new, do not jump straight into customer devices. Use a small test batch first.
Pre-seal test
Before sealing the phone, test:
- front camera sharpness at normal selfie distance
- rear main camera sharpness
- near focus and far focus where relevant
- any additional rear lenses
- whether haze, softness, or focus hunting is already present
This one habit can save a huge amount of dispute cost.
If the phone is clear before sealing and blurry after sealing, the shop has already narrowed the root cause dramatically.
What evidence wins disputes
A repair shop should treat blurry camera complaints like evidence cases, not like customer mood problems.
The strongest file usually includes:
Intake evidence
- pre-repair front and rear camera test shots if possible
- photos of external condition
- any signs of drop damage
- notes on camera condition at intake
During-repair evidence
- bracket and frame photos
- any dust or contamination found
- transferred parts layout
- notes on whether hot air or IPA was used near the camera zone
Pre-seal evidence
- front and rear camera sample shots
- timestamped comparison records
- notes on whether the image was clear before final closure
Part identity evidence
- supplier
- SKU
- batch
- with-frame or without-frame
- ordered structure / grade
Complaint timing evidence
- blurry immediately after install
- blurry only after sealing
- blurry only after some use or heat
This is what lets a shop separate three very different conversations:
- “The phone already had camera damage.”
- “We introduced this during repair.”
- “This batch has a part-side tolerance problem.”
Without that structure, the supplier says installer error, the customer says repair damage, and the shop absorbs the cost.
The real business takeaway
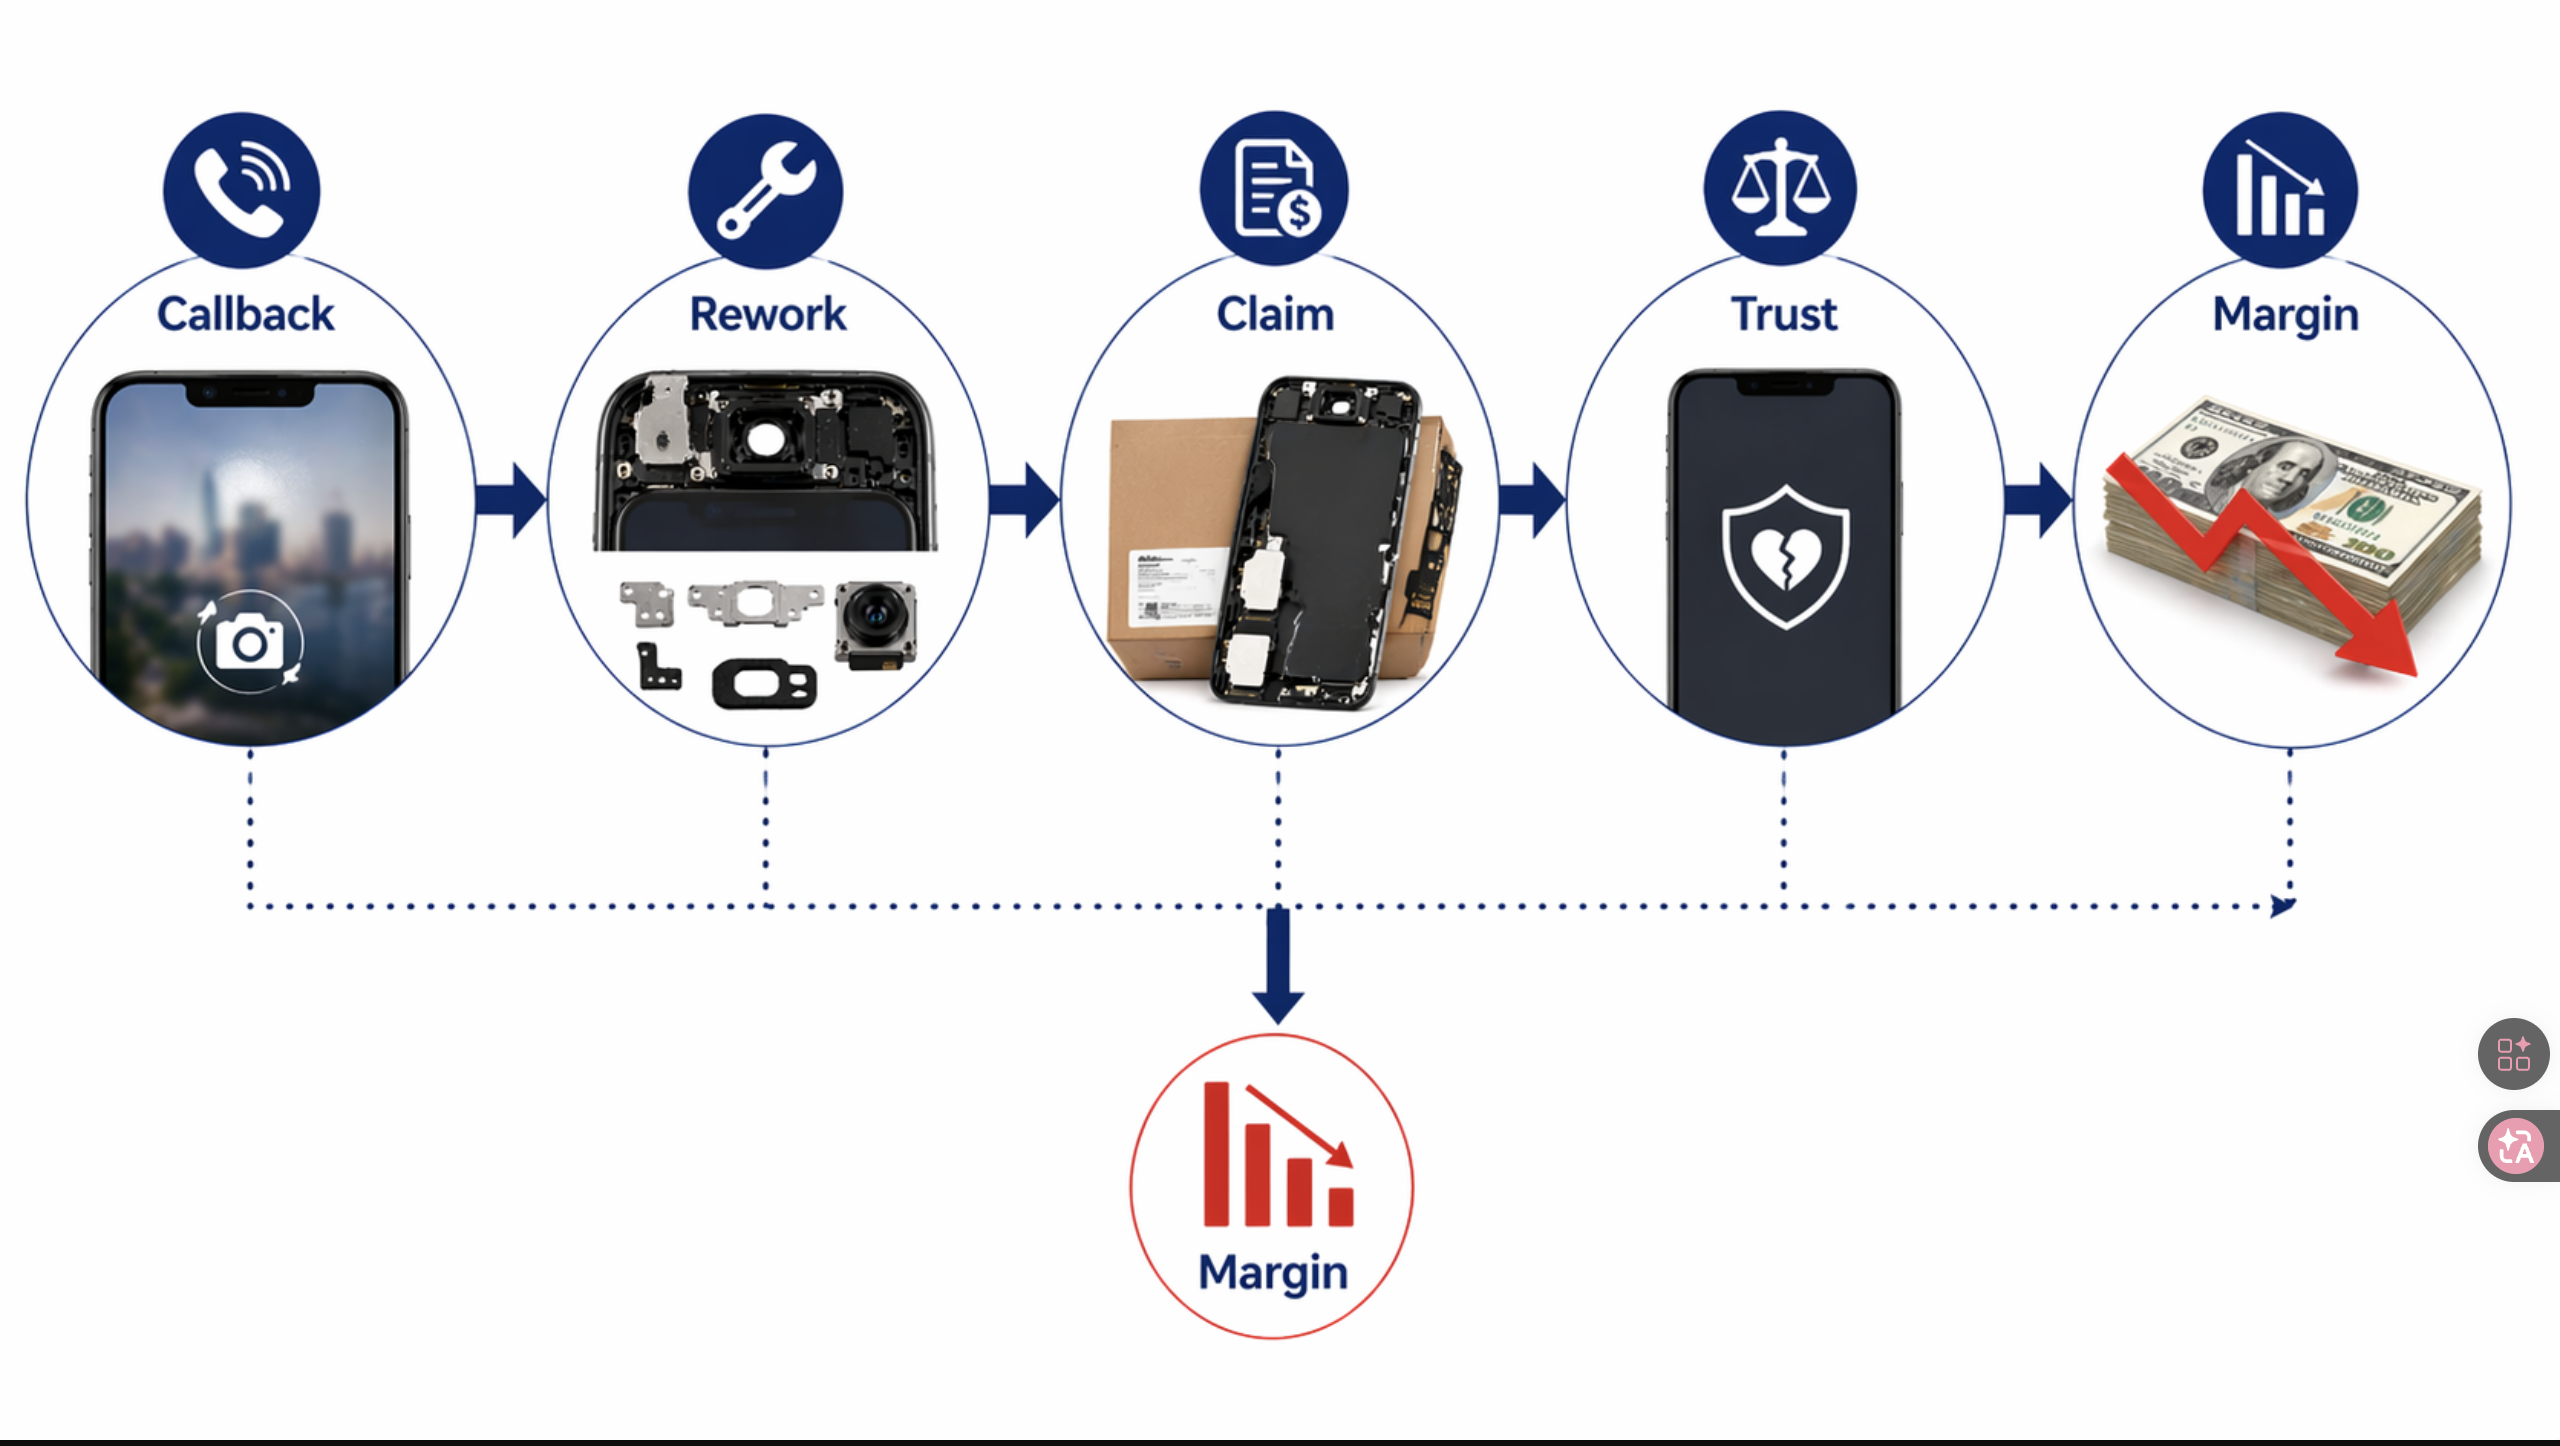
A blurry camera after screen replacement is not just a technical nuisance. It is one of the clearest examples of how repair quality, supplier quality, and intake discipline all collide in one complaint.
The repair shop that loses money here is usually not the one with the worst technician. It is the one with the weakest decision process.
If your team does not test the camera at intake, does not capture pre-seal samples, does not question supplier tolerance around the camera area, and does not isolate front-camera blur from rear-camera blur, then every complaint becomes harder than it should be.
That is why the correct response is not “replace the camera and hope.” It is:
- identify whether the fault is pre-existing, install-side, or supplier-side
- tighten buyer questions before ordering
- standardize receiving QC around the camera area
- make pre-seal camera testing mandatory
- document the case before blame gets assigned
If you do that well, you reduce callbacks, protect trust, and make supplier conversations much harder to dismiss.
If your shop is comparing assemblies for new iPhone models, review our wholesale iPhone screens buyer checklist, align your customer-handling process with the repair shop customer dispute script, and use lessons from aftermarket screen customer complaints to stop expectation mismatch before it becomes margin loss.
FAQ
Is blurry camera after screen replacement always caused by the screen?
No. It may come from pre-existing drop damage, dust, heat, IPA, bracket misalignment, or only indirectly from the screen assembly. The screen is just one possible cause.
Why is the front camera blurry after screen replacement but still working?
Front cameras are often fixed-focus, so they can still open normally while producing soft images if seating, spacing, aperture alignment, film residue, or contamination is wrong.
If the rear camera is blurry after screen replacement, should I suspect heat first?
Heat should be high on the list if hot air was used nearby, especially if the image became milky or uniformly soft. But you should also consider pre-existing drop damage, IPA residue, bracket pressure, and contamination.
Can a supplier batch really cause camera blur complaints?
Yes. If multiple units from the same supplier batch produce the same front-camera softness pattern, especially across different technicians, the problem may be screen geometry or camera-area tolerance rather than install quality.
What is the best single habit to reduce this kind of dispute?
Pre-repair and pre-seal camera testing. Without those two checkpoints, a repair shop loses most of its leverage in responsibility disputes.
External reference points
Useful reference points behind this article include:
- iFixit — Blurry Camera troubleshooting
- iFixit — Camera not focusing after lens replacement
- iFixit — iPhone camera blurry after removing broken glass
- cmnsfixmac — iPhone front camera blurry after screen replacement
- Android Authority — what is PDAF and how does it work
CTA
If you keep seeing blurry camera complaints after screen replacement, do not treat them as random bench mistakes. Ask PRSPARES for a screen-assembly QC pack before ordering — including frame status, bracket and foam layout, camera-window inspection, inner-film removal standard, pre-seal test guidance, and batch complaint handling terms. That gives your team a better chance of catching camera-area risk before the job turns into a callback.