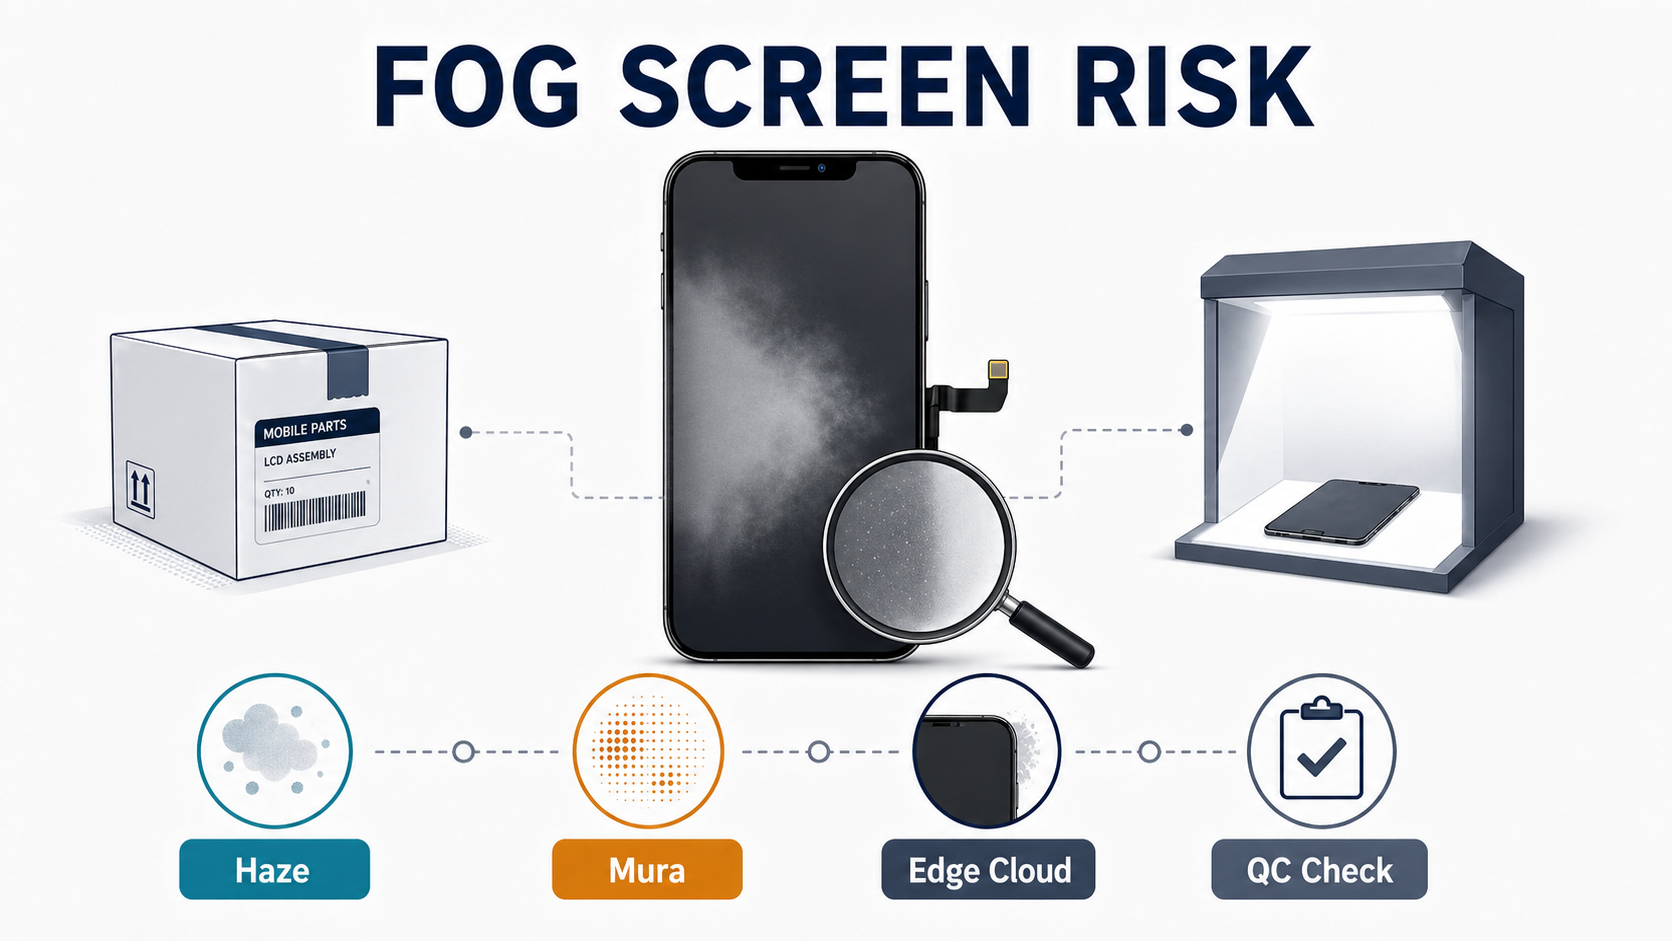
Replacement Screen Not Sitting Flush: Frame, Bracket, and Adhesive Problems Buyers Should Check

A replacement screen not sitting flush is not a small cosmetic problem. It is usually an early warning that something in the buying decision, assembly stack, or host phone condition is already wrong.
For a repair shop, this matters because the cost comes twice. First, the job takes longer because the technician has to stop, reopen, recheck, or replace parts. Second, the callback risk goes up because a customer can see the lip, the gap, or the proud corner immediately. What looks like a bench issue often turns into a supplier dispute, a return request, or a margin loss problem.
That is why this article is not a DIY guide about pressing the screen harder. It is a buyer-oriented guide for repair shops and wholesale screen buyers. The goal is to help you decide whether the problem is part-side, install-side, or phone-side, what you should ask suppliers before ordering, what you should check before bonding, and what evidence you need if the complaint turns into an RMA argument.
Sourcing Replacement Screens in Bulk?
Incell / Hard OLED / Soft OLED grades — wholesale pricing, grade comparison on request.
Get Wholesale QuoteWhat a replacement screen not sitting flush actually means
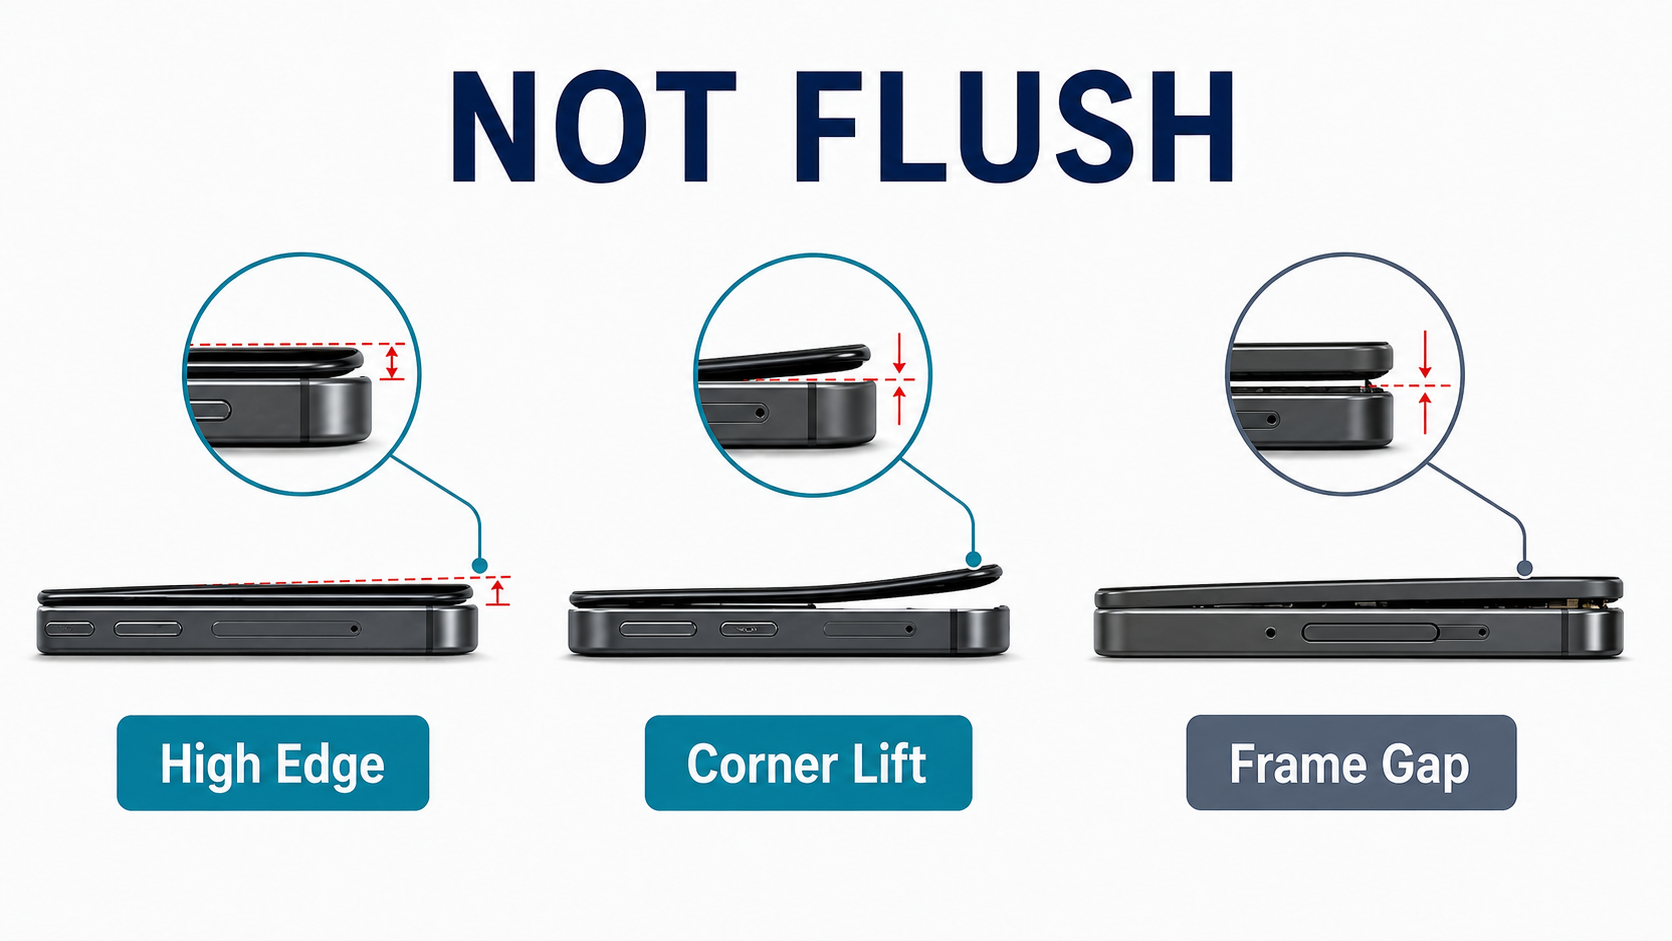
In repair-shop terms, a screen sits flush when the panel closes level with the housing, with no visible edge standing high, no uneven gap around the perimeter, and no section that can be pressed down only to spring back up again. That practical closure standard matches the inspection logic in Apple’s repair instructions, where clips, adhesive, transferred assemblies, and final closure all affect whether the display sits correctly after reassembly.
For real-world troubleshooting, it helps to separate three similar-looking outcomes:
- Fitment issue: the replacement assembly cannot close evenly and stay seated in the target housing under the correct install process
- Sitting proud: part of the panel stands above the housing instead of lying level with it
- Screen lift: the panel looked acceptable after closure but later reopened or separated at one edge or corner
Customers often describe all three as “the screen won’t go down” or “the screen is lifting.” But for a buyer, they are not the same thing.
A panel that sits high during the first dry-fit usually points to structure, thickness, frame, or bracket compatibility. A panel that sits correctly at first and reopens later is more likely linked to adhesive process, contamination, pressure, or hidden phone-side stress.
That distinction is important because a repair shop that mislabels every fitment problem as “bad screen quality” will keep filing weak claims and keep buying the wrong type of stock.
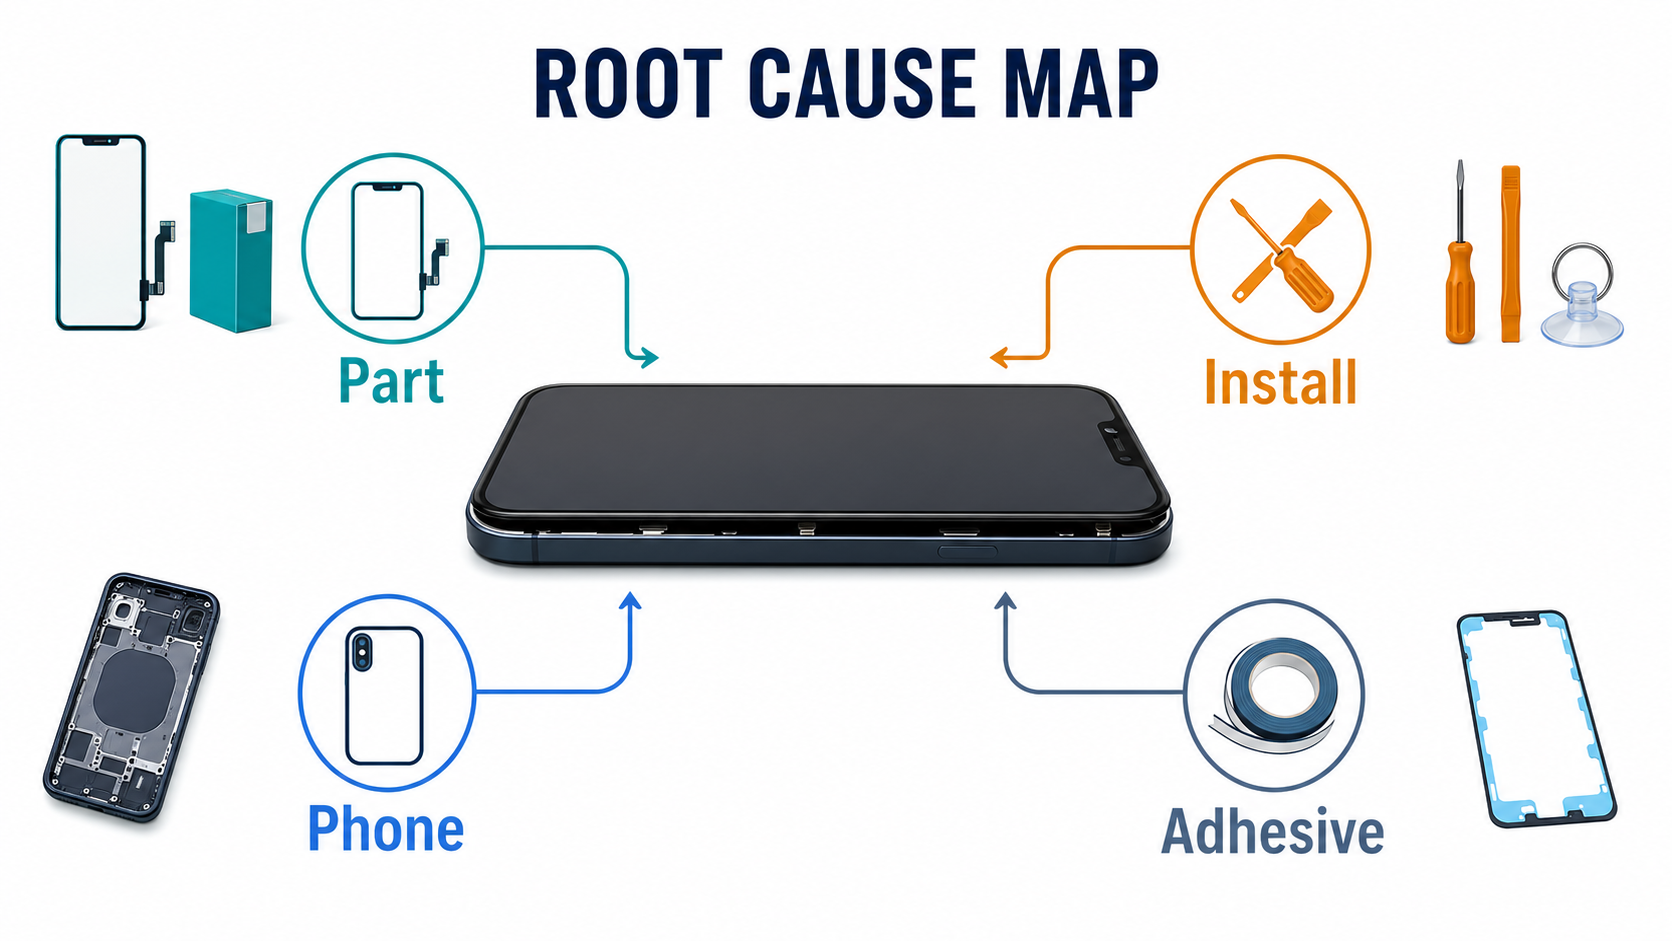
The first split: part-side, install-side, or phone-side?
The most useful way to diagnose a screen fitment problem is not by brand hype or by technician instinct. It is by splitting the problem into three buckets.
Part-side causes
These are problems created by the replacement assembly itself:
- wrong display structure for the original phone
- wrong grade or low-tolerance aftermarket build
- framed assembly with poor geometry
- copied top bracket parts that do not match OEM dimensions
- missing or incorrect pre-installed small parts
- included adhesive set that does not match the model correctly
This is the most expensive category for wholesale buyers because it starts before the technician even opens the phone. If the wrong structure was bought, the job was already at risk before installation began.
This is also why our iPhone screens wholesale OLED vs in-cell comparison matters beyond image quality. The grade decision is not only about brightness, color, and price. It is also about mechanical fit. A structure that is acceptable electrically can still be wrong mechanically.
Install-side causes
These are problems created during the repair process:
- old adhesive still left in the frame channel
- adhesive double-stacked by mistake
- folded tape or wrong liner sequence
- contaminated bonding surface
- flex cable trapped under a shield or bracket
- sensor assembly not seated fully
- uneven clamp pressure or poor dwell time
A correct screen can still end up looking wrong if the installation stack is wrong. This is one reason our incoming QC for wholesale phone screens guide should never stop at “touch works” or “image works.” Fitment is part of the real repair outcome.
Phone-side causes
These are problems created by the host phone itself:
- bent housing rails
- dented corners after a drop
- damaged clips
- glass fragments left in the channel
- previous poor repair work
- swollen battery pushing upward from inside
- warped internal stack or raised component
This bucket is often ignored because it is commercially inconvenient. It is easier to blame the replacement screen than to tell a customer the phone was already distorted or the battery was already pushing the display outward. But that shortcut creates bad claims and weak supplier conversations.
A useful rule for repair shops is simple:
If you do not know which of the three buckets the problem belongs to, you are not ready to blame the part.
The thickness problem buyers underestimate
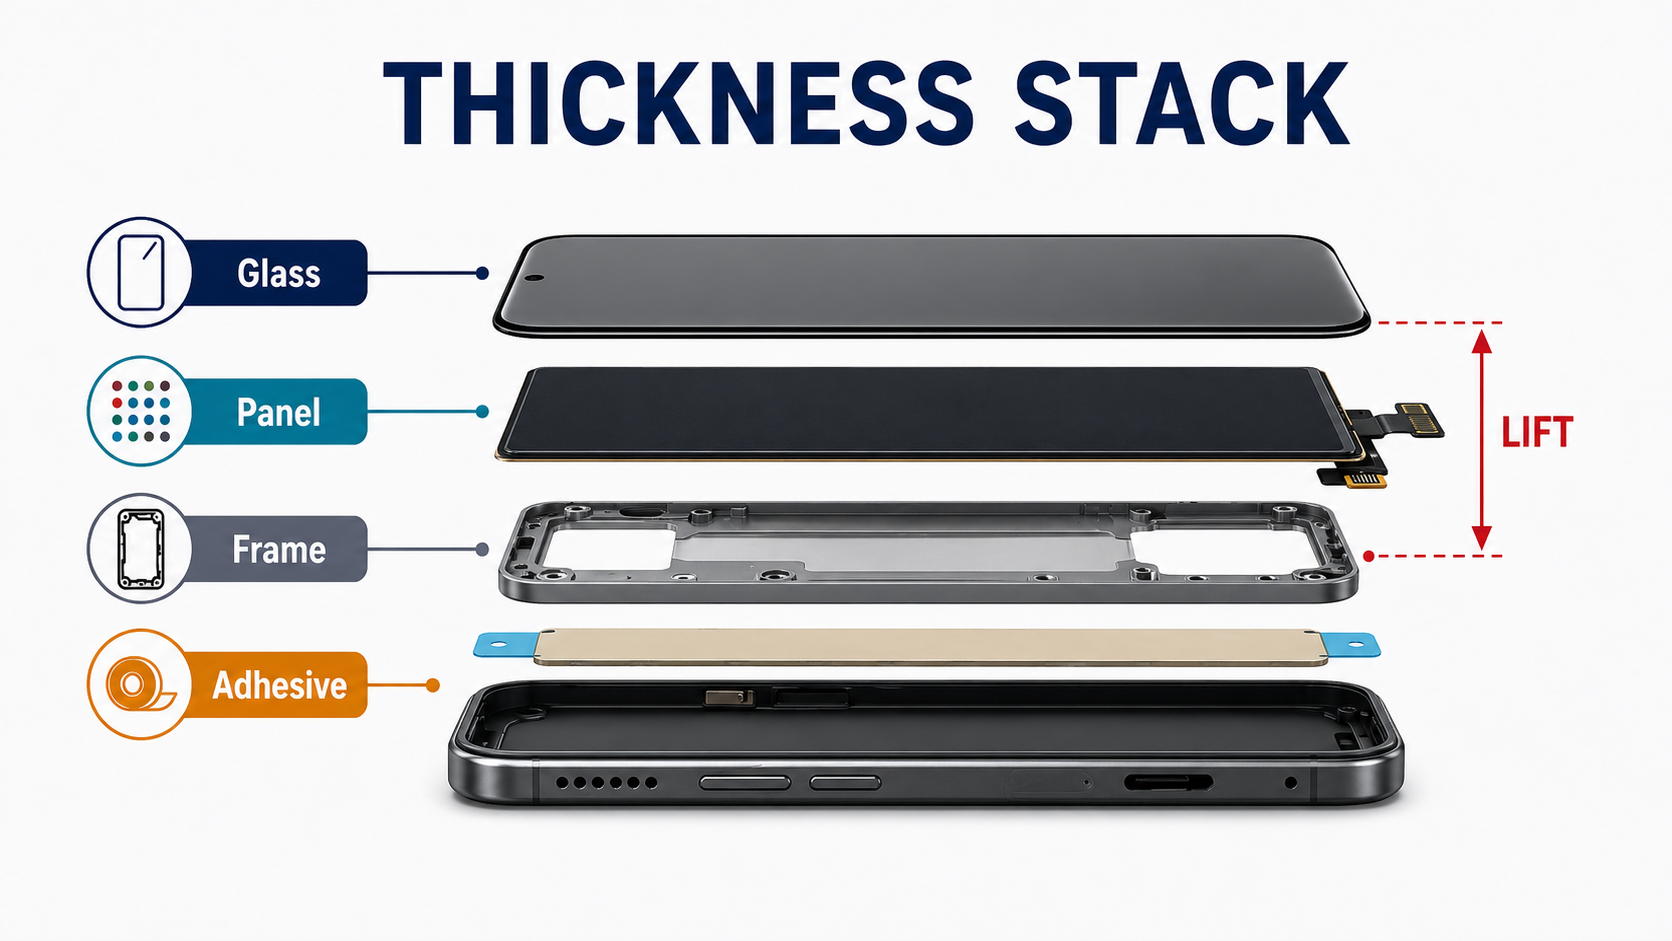
The most common wholesale mistake behind a replacement screen not sitting flush is assuming that all screens sold for one model are mechanically equivalent.
They are not.
On OLED-native phones, the replacement structure matters. OLED is self-emissive and does not need the same backlight stack as an LCD. Samsung Display’s explanation of OLED technology highlights exactly that point: the structure is thinner because it does not require a backlight. In practical terms, that is why replacing an OLED-native assembly with an LCD or Incell substitute can change more than display quality. It can change thickness and closure behavior.
That is why the grade ladder matters in physical fit terms:
- Soft OLED is usually closest to the original fit stack
- Hard OLED can still work well but often leaves less tolerance margin
- Incell / LCD substitutes carry the highest risk on OLED-native housings
This is also why some real-world repair cases show the same pattern: the panel sits evenly high all the way around from the first dry-fit. When that happens, especially on an OLED-native phone, the smarter first question is not “Did the technician trap a cable?” It is “Did we buy the wrong structure?”
A supplier calling a part “premium” or “AAA” does not answer that question. Those labels do not tell you whether the assembly is Soft OLED, Hard OLED, Incell LCD, refurbished original, service pack, with frame, or without frame. For fitment risk, those details matter more than the sales adjective.
This is where our OEM vs aftermarket phone screens guide and iPhone screens wholesale OLED vs in-cell comparison become practical buying tools, not just comparison articles. If the shop chooses the wrong structure to save a small amount on price, the callback cost can erase that saving immediately.
Why top-edge fitment problems are different
Top-edge proudness deserves separate treatment because it is one of the easiest fitment problems to misread.
On iPhones with Face ID, the top zone is crowded. It includes the front camera area, proximity and flood sensor area, brackets, foam, clips, transferred assemblies, adhesive, and flex routing. Apple’s official display repair flow makes it clear that transferred top-side parts and closure checks are fitment-critical, and iFixit’s display guides reinforce the same point from the repair side.
In real repair scenarios, top-edge lift often comes from:
- front sensor assembly not fully seated
- copied top bracket parts with slightly wrong dimensions
- foam or cowling parts sitting too high
- flex cable routing creating upward pressure
- screws or brackets pulling one side out of alignment
That is why a top-edge-only problem should not be treated the same way as a full-perimeter problem.
A full-perimeter problem often suggests structure mismatch. A top-edge problem more often suggests bracket, sensor, or routing interference.
This matters for supplier conversations too. If a repair shop sends an RMA message saying “screen not flush,” the claim is weak. If the shop can say, “dry-fit shows localized top-edge proudness near the sensor area; rest of perimeter seats normally,” the claim becomes specific and commercially stronger.
For Samsung flagship work, the same logic still applies even though the internal layout differs. The top camera zone, FFC area, residue, and bracket stack can all affect closure. On no-frame OLED jobs, the technician absorbs more of the alignment risk, which means the buyer has to be even more careful about which assemblies are ordered in the first place.
One corner up? Think local obstruction before global quality
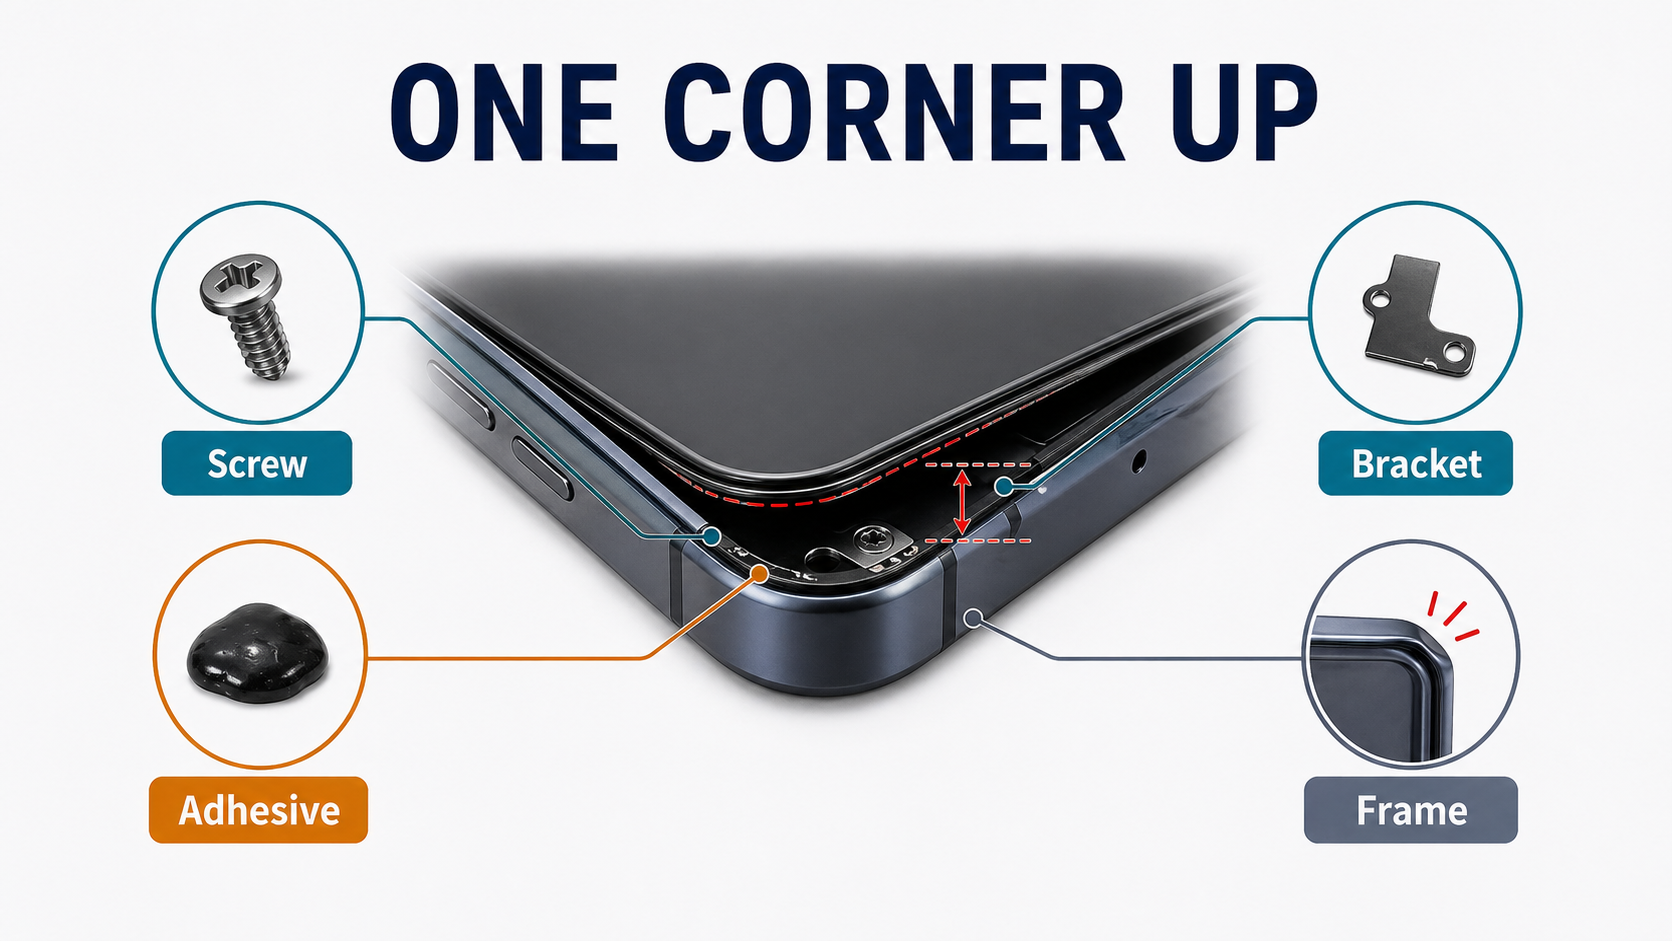
When only one corner or one side refuses to sit correctly, the root cause is often local rather than global.
Typical examples include:
- a bent or dented corner after a previous drop
- one damaged clip that no longer grips properly
- leftover glass or old adhesive in one section of the channel
- one flex cable folded into the wrong path
- one bracket or shield point sitting too high
This is important because repair shops often waste time escalating the wrong complaint.
If three sides fit correctly and one corner stays proud, that is usually not a pure thickness problem. It is more likely a local obstruction, local housing distortion, or localized routing issue.
That should change the language used in both internal diagnosis and supplier claims. Instead of saying, “The part is bad,” the better phrasing is:
“The replacement assembly dry-fits correctly on most of the perimeter, but one localized area remains proud. Need to isolate whether the cause is host housing distortion, clip damage, adhesive residue, or local assembly interference.”
That wording protects your margin because it avoids turning every uncertain case into a low-quality claim that can be rejected immediately.
Why adhesive is part of the fit stack, not a final step
Many shops still treat adhesive as something that happens after the part decision is already made.
That is backwards.
Adhesive is part of the mechanical stack. Apple’s repair logic, Samsung’s training emphasis, and iFixit’s adhesive guidance all point in the same direction: residue removal, correct tape shape, alignment, pressure, and dwell all influence whether the screen closes correctly.
The most common adhesive-related causes of false fitment problems are:
- old adhesive not fully removed
- dirty frame channel under the new tape
- folded or tilted tape
- generic tape where model-specific die-cut adhesive was needed
- adhesive contaminated before closure
- pressing too early or too unevenly
- insufficient dwell time after closure
A practical rule for repair shops is this:
If the screen dry-fits correctly before adhesive but looks wrong after bonding, suspect process before structure.
That does not always clear the supplier. Some included adhesive sets are weak, too thick, badly cut, or inconsistent. Some framed assemblies come with tape that is technically present but commercially unreliable. But the shop still needs proof about when the problem appeared. Did it exist during dry-fit? Or did it appear only after bonding and pressure?
That timing difference often decides whether the claim is strong or weak.
Symptom-to-root-cause map repair shops can use
Before blaming the part, use the symptom pattern to narrow the cause. The table below is the fastest decision tool — match the symptom on the bench, then take the buyer/RMA action that fits.
| Symptom pattern | Likely bucket | First bench check | Buyer / RMA action |
|---|---|---|---|
| Sits high all the way around from first dry-fit | Part-side (structure mismatch) | Compare old vs new assembly thickness; confirm original display tech and grade purchased; verify before adhesive | Reject the lot — wrong structure (often OLED-native fitted with thicker LCD/Incell). File supplier claim with backside photo + ordered SKU |
| Only the top edge is proud | Part-side (top-zone parts) or install-side (transfer error) | Inspect top sensor area; compare transferred parts vs original layout; verify bracket geometry and screw position; check perimeter is normal | Request bracket / sensor proof for the lot. If transferred parts are wrong, isolate as install issue — do not file as bad screen |
| One corner or one side stays high | Phone-side (host) or install-side (local obstruction) | Inspect housing rail and clip condition; check for debris in that exact zone; test whether original screen seats better there; photograph before changing anything | Isolate as host-phone issue (bent rail, damaged clip, debris). Filing as supplier claim will usually fail |
| Fits during dry-fit but lifts later | Install-side (adhesive process) or phone-side (battery/heat) | Compare pre-bonding vs post-bonding condition; inspect adhesive shape and placement; review clamp/press method; rule out battery swelling | File as process-side claim with timing evidence (dry-fit photo + post-bonding photo). Adhesive batch may still be supplier issue if many lots show same failure |
| Original screen was already opening before repair | Phone-side (pre-existing) | Inspect battery condition first; inspect housing rails and clips; do not assume replacement caused original symptom | Document at intake, not at install — battery swelling or housing damage. Communicate condition to customer before quoting the job |
What buyers should ask suppliers about fitment specifically
If your shop wants fewer fitment callbacks, the supplier conversation must get more technical. The four questions below are fitment-specific — they are the layer that generic supplier vetting misses. For full supplier evaluation (general grade, warranty, sourcing, RMA basics), see our wholesale iPhone screens buyer checklist.
1. What is the exact display structure, and how does its thickness compare to the original?
For OLED-native models, ask whether the screen is service pack / refurbished original / Soft OLED / Hard OLED / LCD or Incell LCD — and how it compares dimensionally to the original assembly. Do not accept vague words like premium, AAA, or high quality as the final answer.
2. Is it with frame or without frame, and whose frame and bracket set is used?
With-frame assemblies can reduce transplant risk but introduce their own tolerance risk if the frame geometry is poor. Ask for whose frame, whose bracket set, and whether top small parts are pre-installed. For framed assemblies on flagship models, ask for current-lot backside photos so you can verify bracket geometry before shipment leaves.
3. Which top-edge small parts and adhesive system are included?
Ask whether the assembly includes proximity / sensor flex, front-camera bracket parts, foam or cowling, and adhesive-backed top-zone components. If original parts must be transferred, get a parts layout confirmation. On the adhesive side, confirm whether the shipment includes pre-cut perimeter adhesive, separate frame tape, gasket, foam stack, and which liner sequence the supplier recommends — plus their suggested press/dwell method.
4. What evidence does the supplier require for fitment-related RMAs?
This is where many buyers lose money. Before ordering, get answers to:
- is dry-fit evidence (panel proud before adhesive is applied) accepted as RMA proof?
- does removed protective film disqualify the claim?
- are ripped flexes excluded automatically?
- what photos or video angles are mandatory (top-edge close-up, corner spring-back, host-frame condition)?
- what lot, SKU, or invoice references must appear in the claim?
If you wait to ask these questions after the callback starts, the supplier has already gained the advantage.
Fitment-specific receiving QC
For general receiving QC (carton inspection, SKU/lot capture, packaging photos, function testing), see our incoming QC for wholesale phone screens guide and wholesale iPhone screens buyer checklist. The four steps below are the fitment-specific layer that those general workflows do not cover — what to do at goods-in so you catch a proud-fit problem before it reaches a paid repair.
Step 1. Inspect the backside before the panel is committed
Compare the new assembly's backside to the original or to a known-good unit. Check:
- with-frame vs without-frame layout matches what was ordered
- bracket shape and clip geometry
- top sensor zone stack
- foam, gasket, or tape presence
- whether sensor flexes are pre-installed as promised
Mismatch here predicts most full-perimeter and top-edge fitment problems before any tool touches the device.
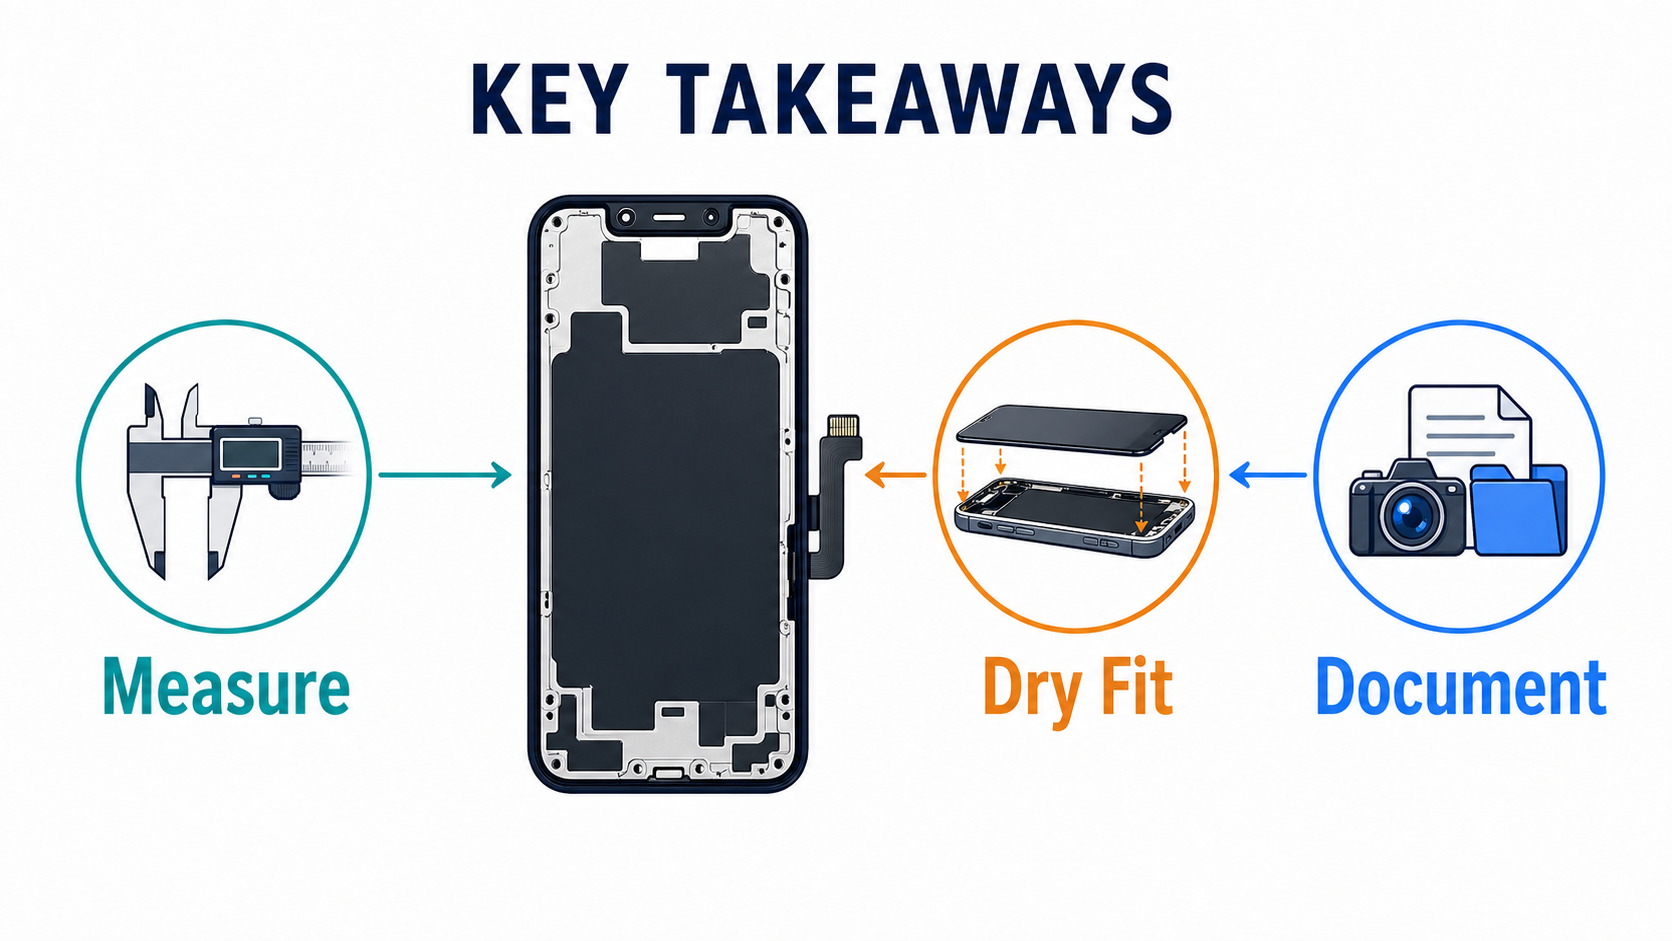
Step 2. Dry-fit before any adhesive liner is removed
This is the single highest-value fitment check in the entire workflow. Before removing adhesive liners, confirm:
- the panel sits level in the housing
- the top edge closes correctly
- no corner rocks or springs back when pressed
- no cable path creates upward pressure
If the screen does not sit flat without adhesive, adhesive will not magically solve a structure problem. Photograph the dry-fit result. That photo is the strongest single piece of RMA evidence you can produce later.
Step 3. Inspect the host phone as aggressively as the part
A surprising share of "screen not flush" complaints come from the device, not the screen. Before blaming the assembly, check:
- bent corners or warped rails
- damaged clips
- glass fragments or old adhesive lumps in the channel
- battery swelling pushing the display upward
- signs of previous poor repair work
If the host phone is distorted, even a perfect screen will fail to seat.
Step 4. Record press and dwell method per device class
Stop relying on memory alone. For each device class, record the press / clamp / dwell method used (force, duration, heat or no heat, technician). When a fitment issue surfaces later, you can isolate whether the failure was structure, adhesive, or process — instead of guessing.
Fitment evidence: what wins an RMA
A strong fitment claim file proves four things, in this order:
- what was ordered (structure + frame status)
- what condition the host phone was in before install
- what dry-fit looked like before any adhesive was removed
- when the proud fit appeared — before bonding, after bonding, or after heat/use
For the fitment-specific evidence layer (what wins the dispute), capture:
- ordered structure and frame status from the PO
- backside layout photos comparing new vs original
- dry-fit perimeter photos, especially top edge and corners — this is the single piece of evidence most suppliers cannot dismiss
- host-device frame and battery photos showing housing rail / clip / swelling condition
- adhesive shape and placement photos before bonding
- timing notes: did the issue exist before bonding, after bonding, or only after heat/use?
For the general invoice/SKU/lot capture layer, see the wholesale iPhone screens buyer checklist.
If your team cannot show whether the proud fit existed before adhesive, the supplier will usually default to process blame. If your team can show dry-fit evidence, local housing condition, and exact ordered structure, the claim becomes much harder to dismiss.
The real business takeaway
The biggest mistake repair shops make is treating a proud screen as a bench problem only.
It is often a buying problem first, an installation problem second, and only sometimes a simple repair mistake.
If a shop keeps reordering the wrong structure, accepting vague supplier labels, or bonding fitment-risk screens without dry-fit evidence, the callbacks are not random. They are built into the process.
That is why the correct response to a replacement screen not sitting flush is not “push harder.” It is:
- identify whether the issue is part-side, install-side, or phone-side
- tighten supplier questions before the next order
- add fitment checks to receiving QC
- document the problem before you commit the part to adhesive
Do that consistently, and you reduce not only fitment complaints but also the supplier disputes and margin loss that come with them.
If your team is comparing different assemblies for a new model, start with our wholesale iPhone screens buyer checklist, review your incoming process in our incoming QC for wholesale phone screens guide, and use the iPhone screens wholesale OLED vs in-cell comparison to avoid ordering a structure that creates proud-fit problems from day one.
FAQ
Why does a replacement screen sit high all the way around?
If the screen sits uniformly high around the perimeter from the first dry-fit, the most likely cause is structure mismatch. On OLED-native phones, that often means a thicker LCD or Incell substitute was ordered instead of the correct OLED-type structure.
If only the top edge is not flush, is it still a bad screen?
Not necessarily. Top-edge issues often come from sensor, bracket, front-camera, foam, or flex-routing interference. On iPhones with Face ID and on Samsung flagships, the top zone is one of the highest-risk fitment areas.
Can adhesive alone make a correct screen look wrong?
Yes. Residual glue, wrong tape thickness, contaminated bonding surfaces, folded liners, or poor pressure can all create false fitment problems. That is why dry-fit before bonding is essential.
Should repair shops blame the supplier whenever a screen lifts?
No. A screen lift or proud fit can also come from bent housing rails, damaged clips, previous repair mistakes, or a swollen battery. The root cause should be documented before supplier blame is assigned.
What is the best next step before ordering this type of screen?
Request the model-specific fitment spec before ordering. Ask for original display type, replacement structure, frame status, pre-installed small parts, adhesive format, and RMA proof rules before the shipment leaves the supplier.
External reference points
The most useful external references behind this article are:
- Apple Support — iPhone display repair instructions
- Samsung Display — OLED technology explanation
- iFixit — iPhone 12 screen replacement
- iFixit — applying iPhone display adhesive
- Samsung — Galaxy battery care and maintenance
CTA
If you want fewer fitment-related callbacks, do not order screens by price label alone. Send PRSPARES your model list and target grade, and ask for the model-specific fitment pack before you place the order. That gives your team the original display type, replacement structure, frame status, small-parts setup, adhesive format, receiving QC points, and RMA proof requirements you need before the first install starts.